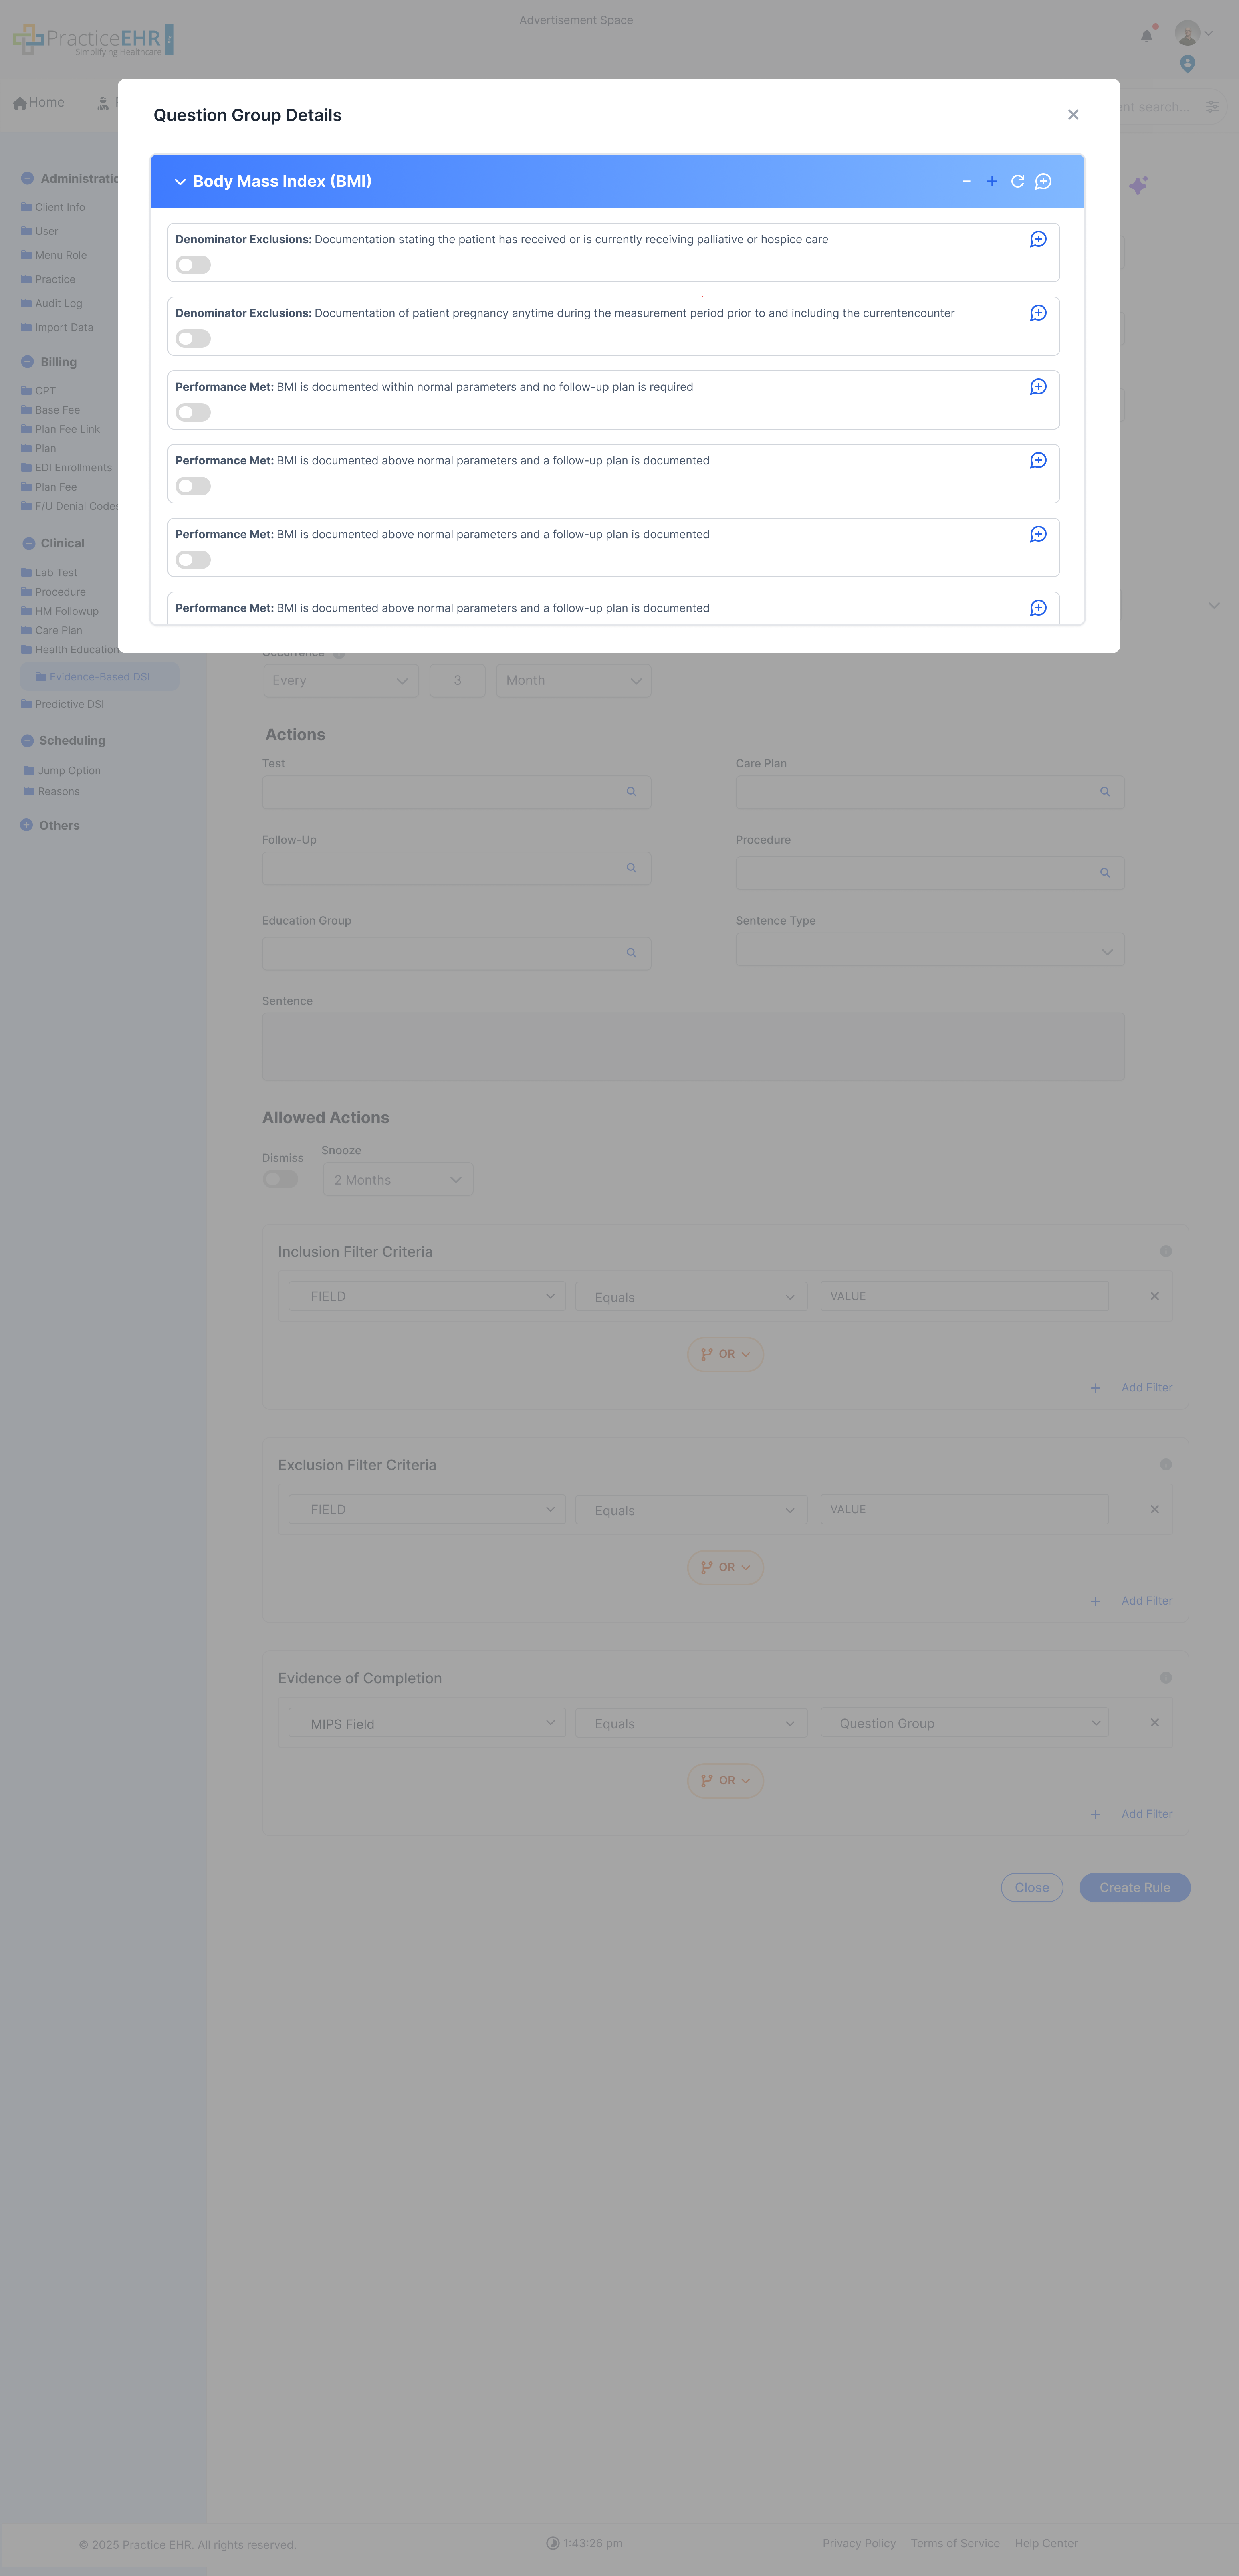
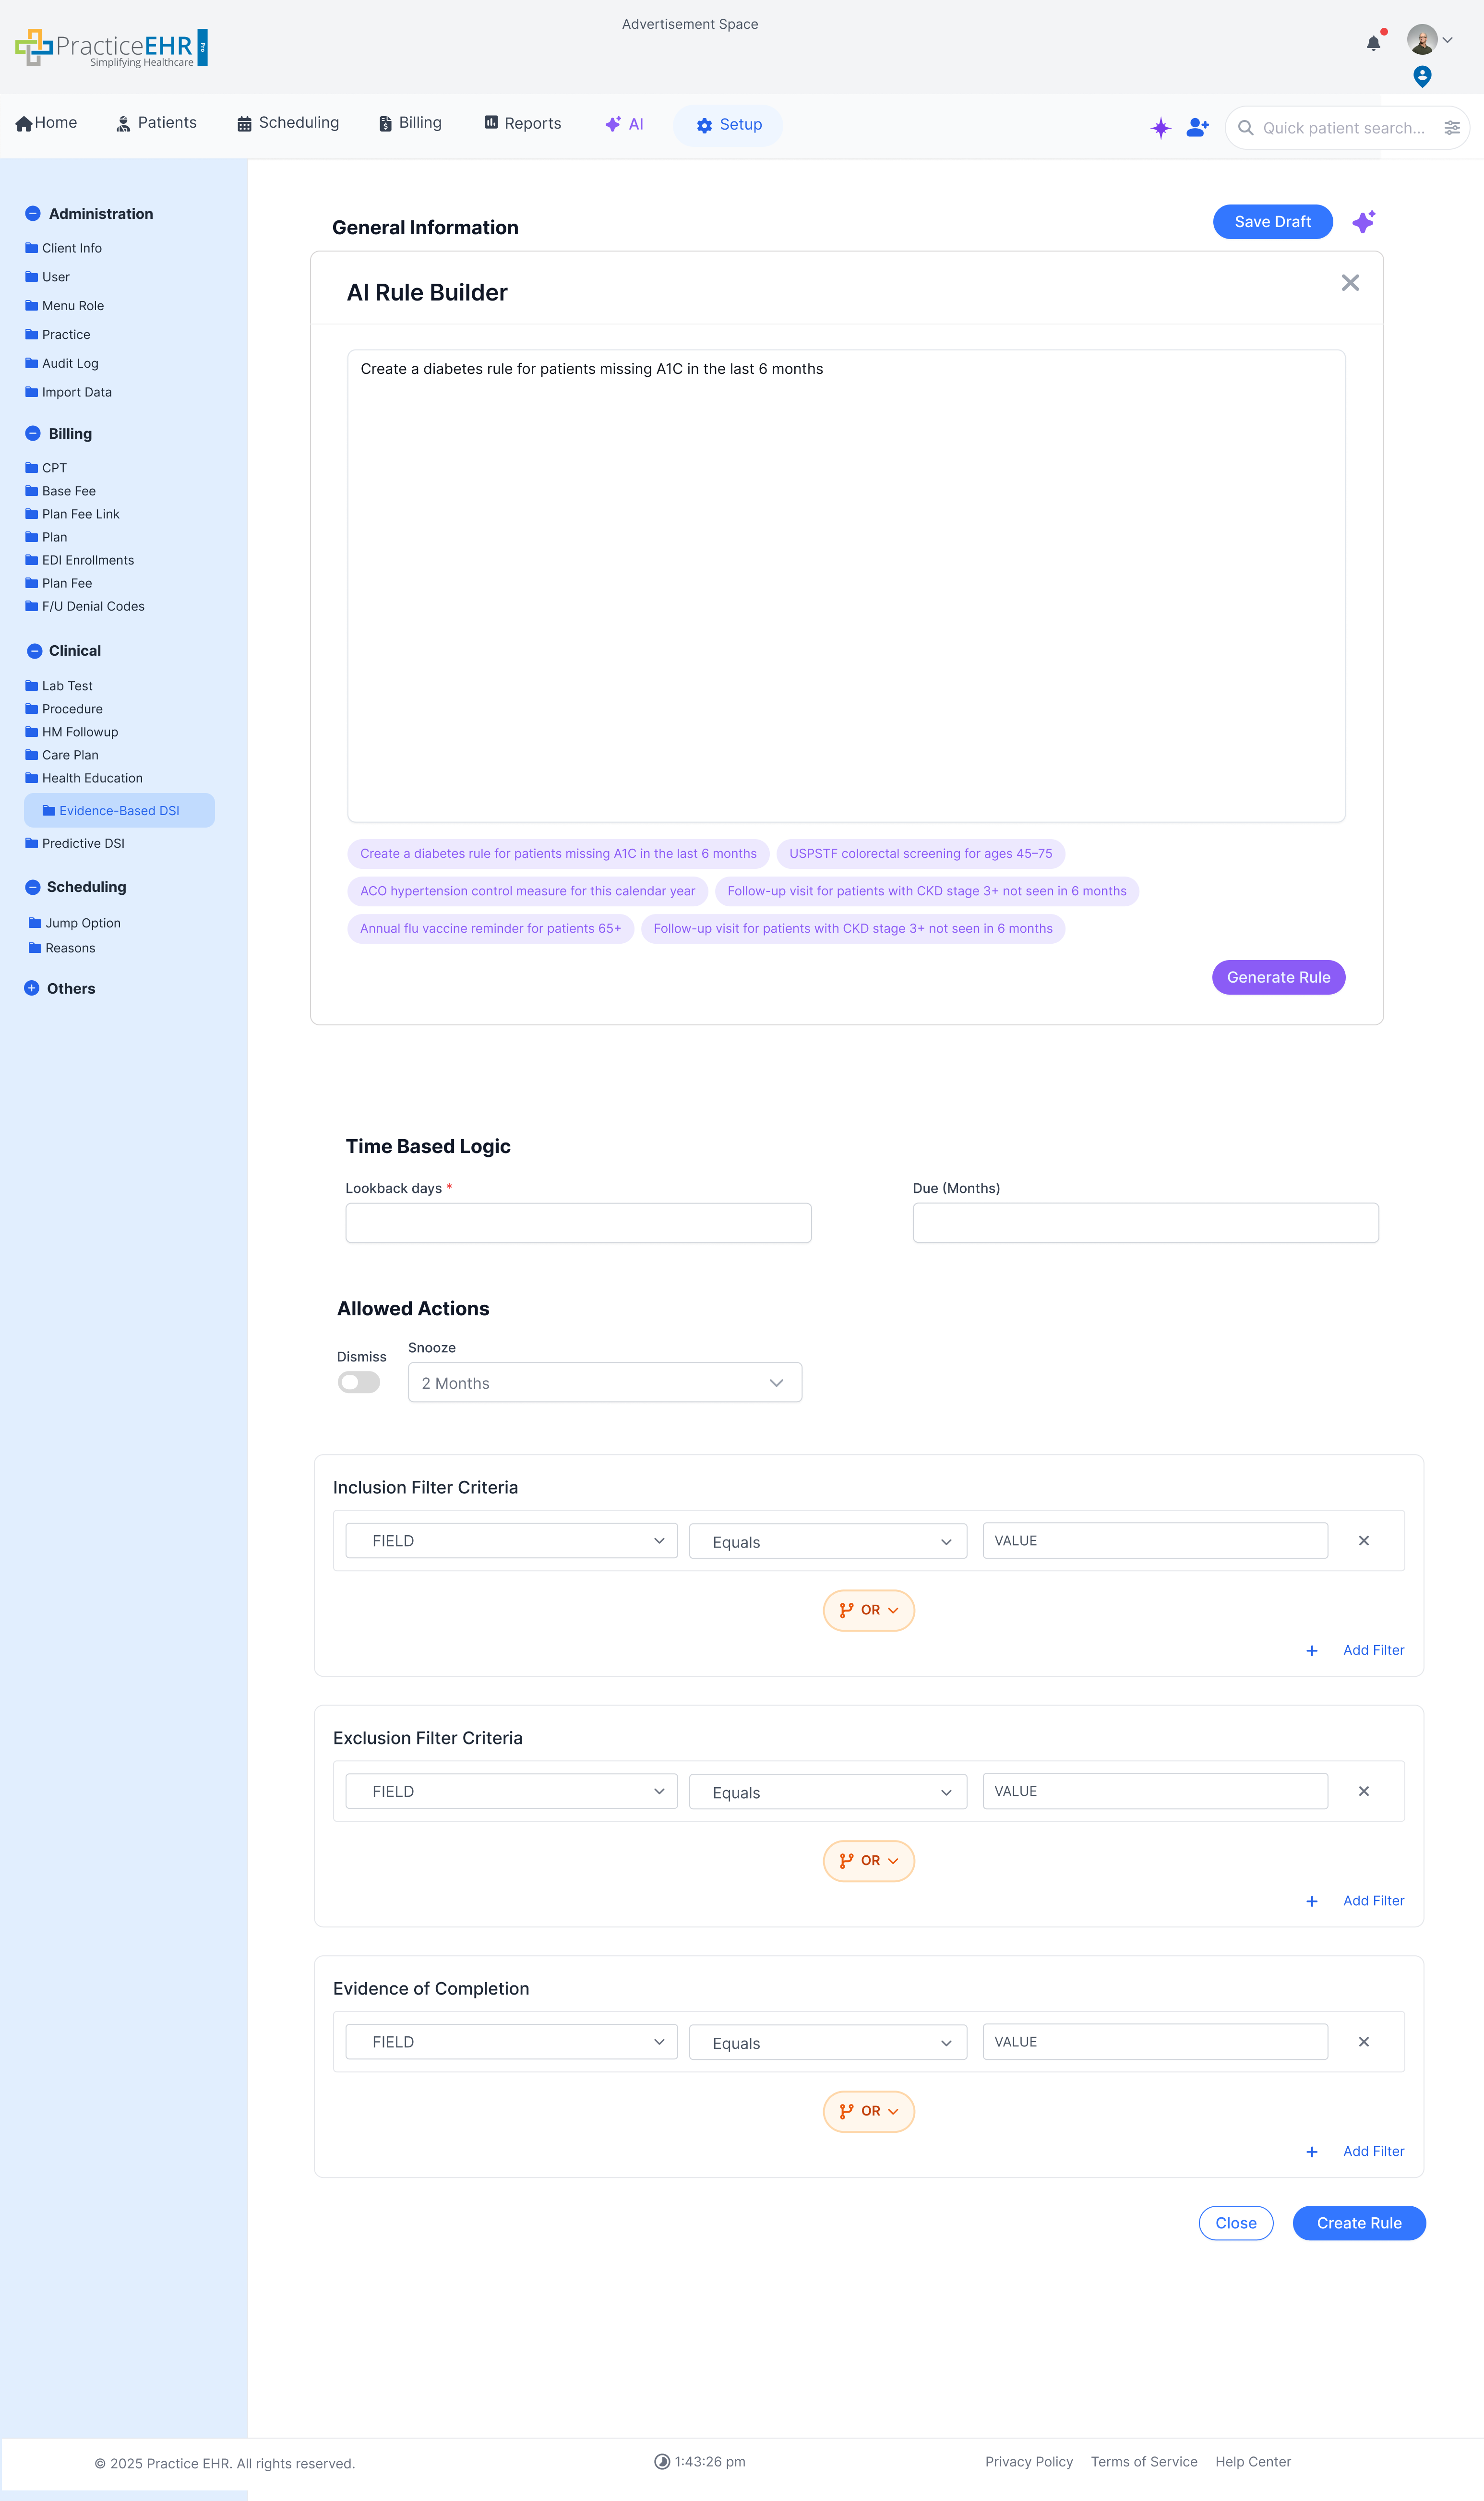
Admin Configuration

Rule Builder

This is where teams create and maintain EBDSI rules. Each rule is built from structured, deterministic logic, with no free text and no assumptions behind the scenes.

How to get here

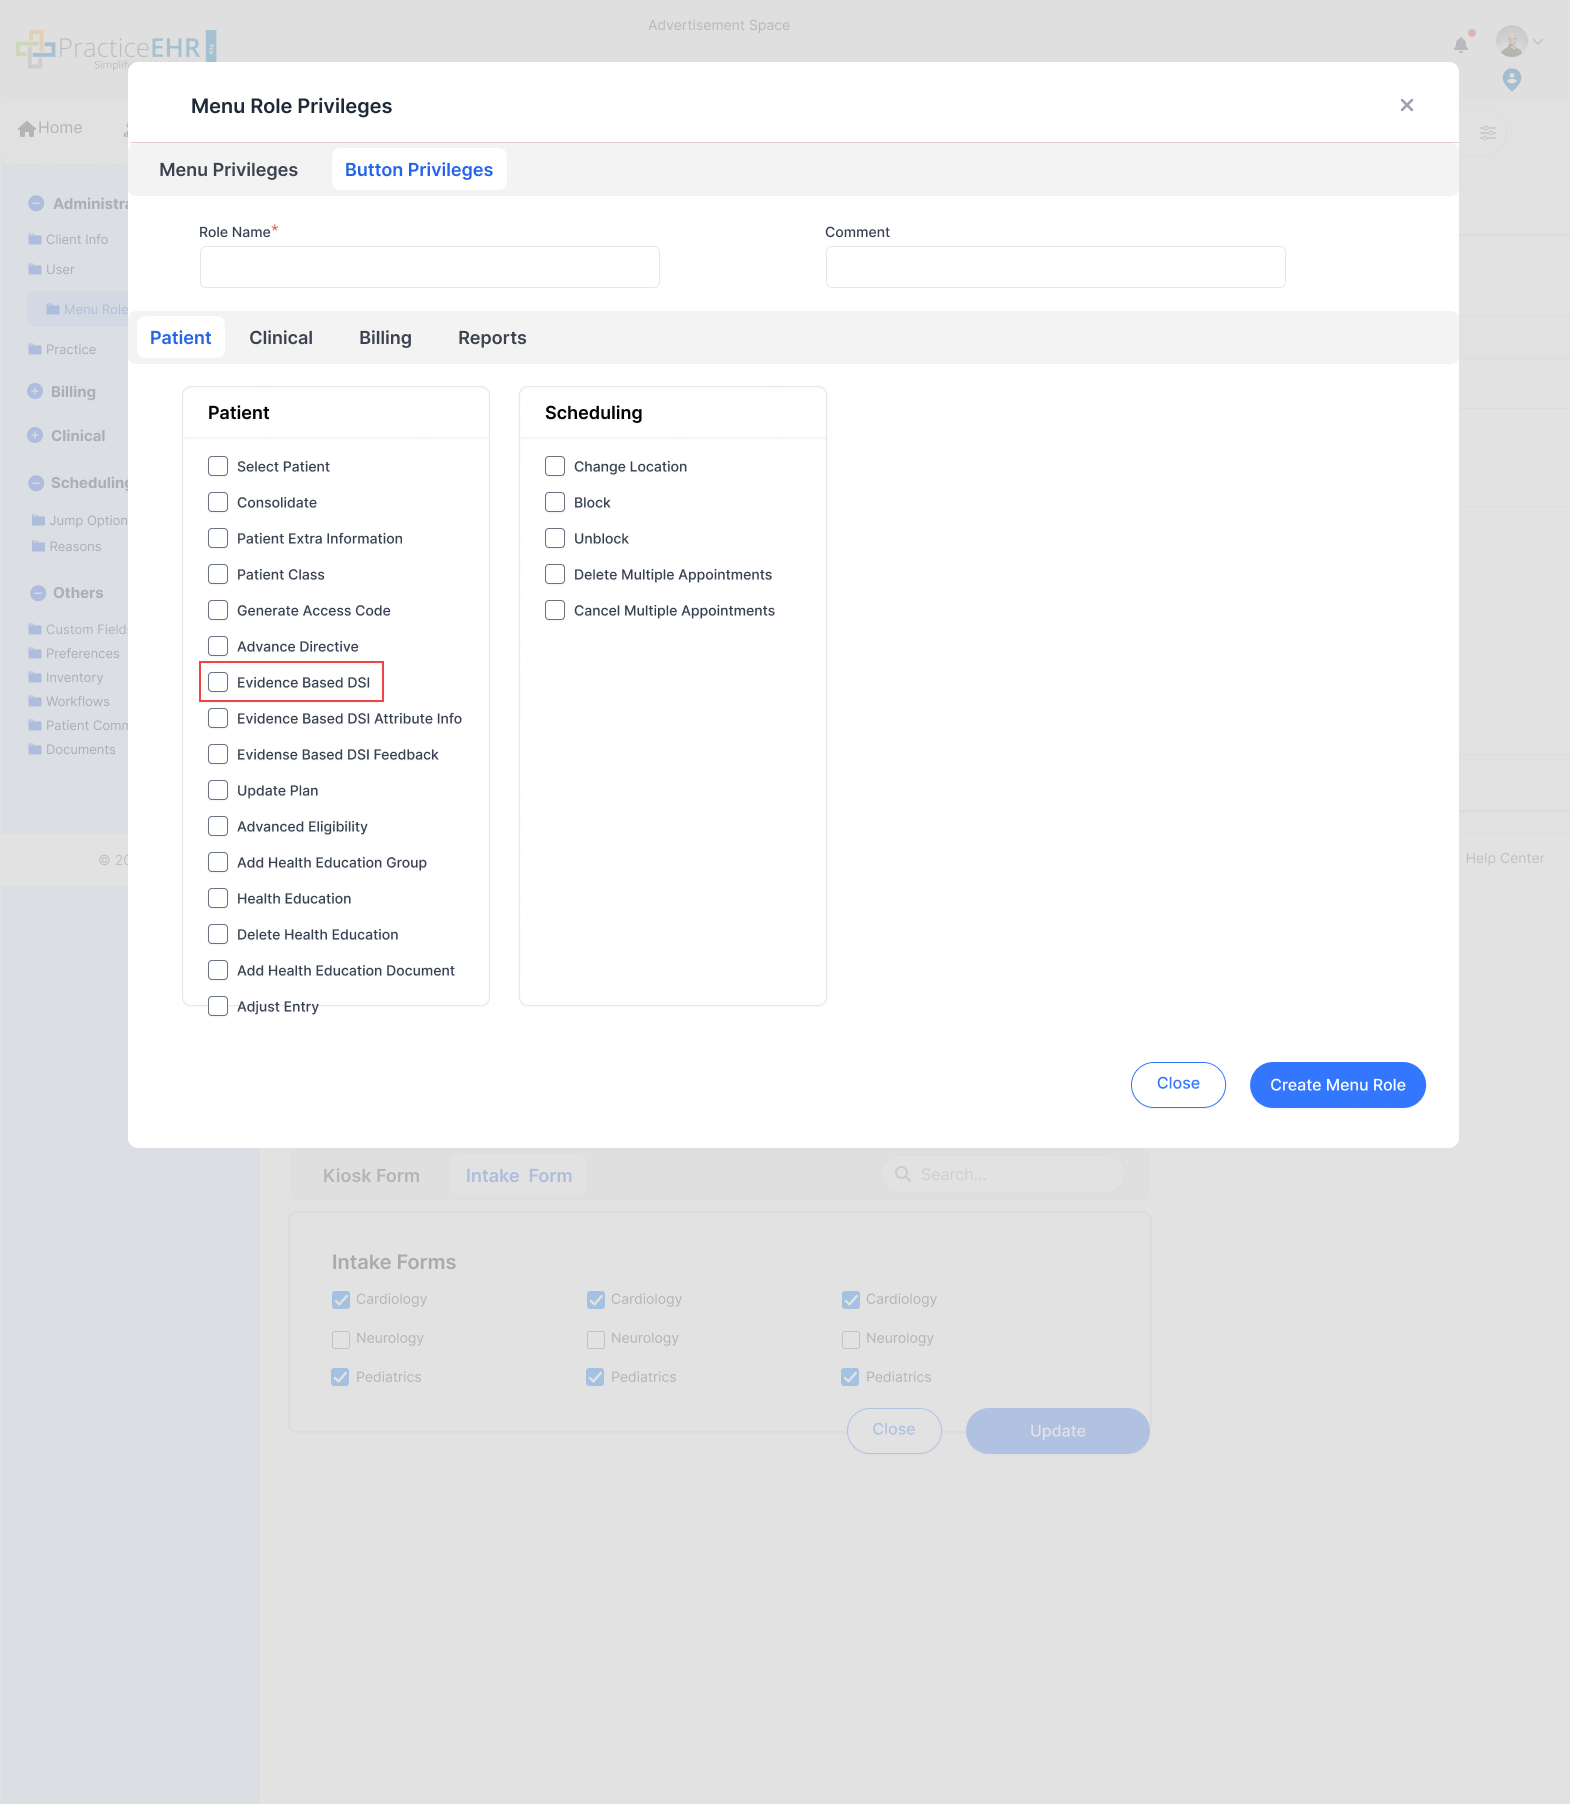
Go to Setup tab → Clinical → EBDSI, then open an existing rule or click New Rule.

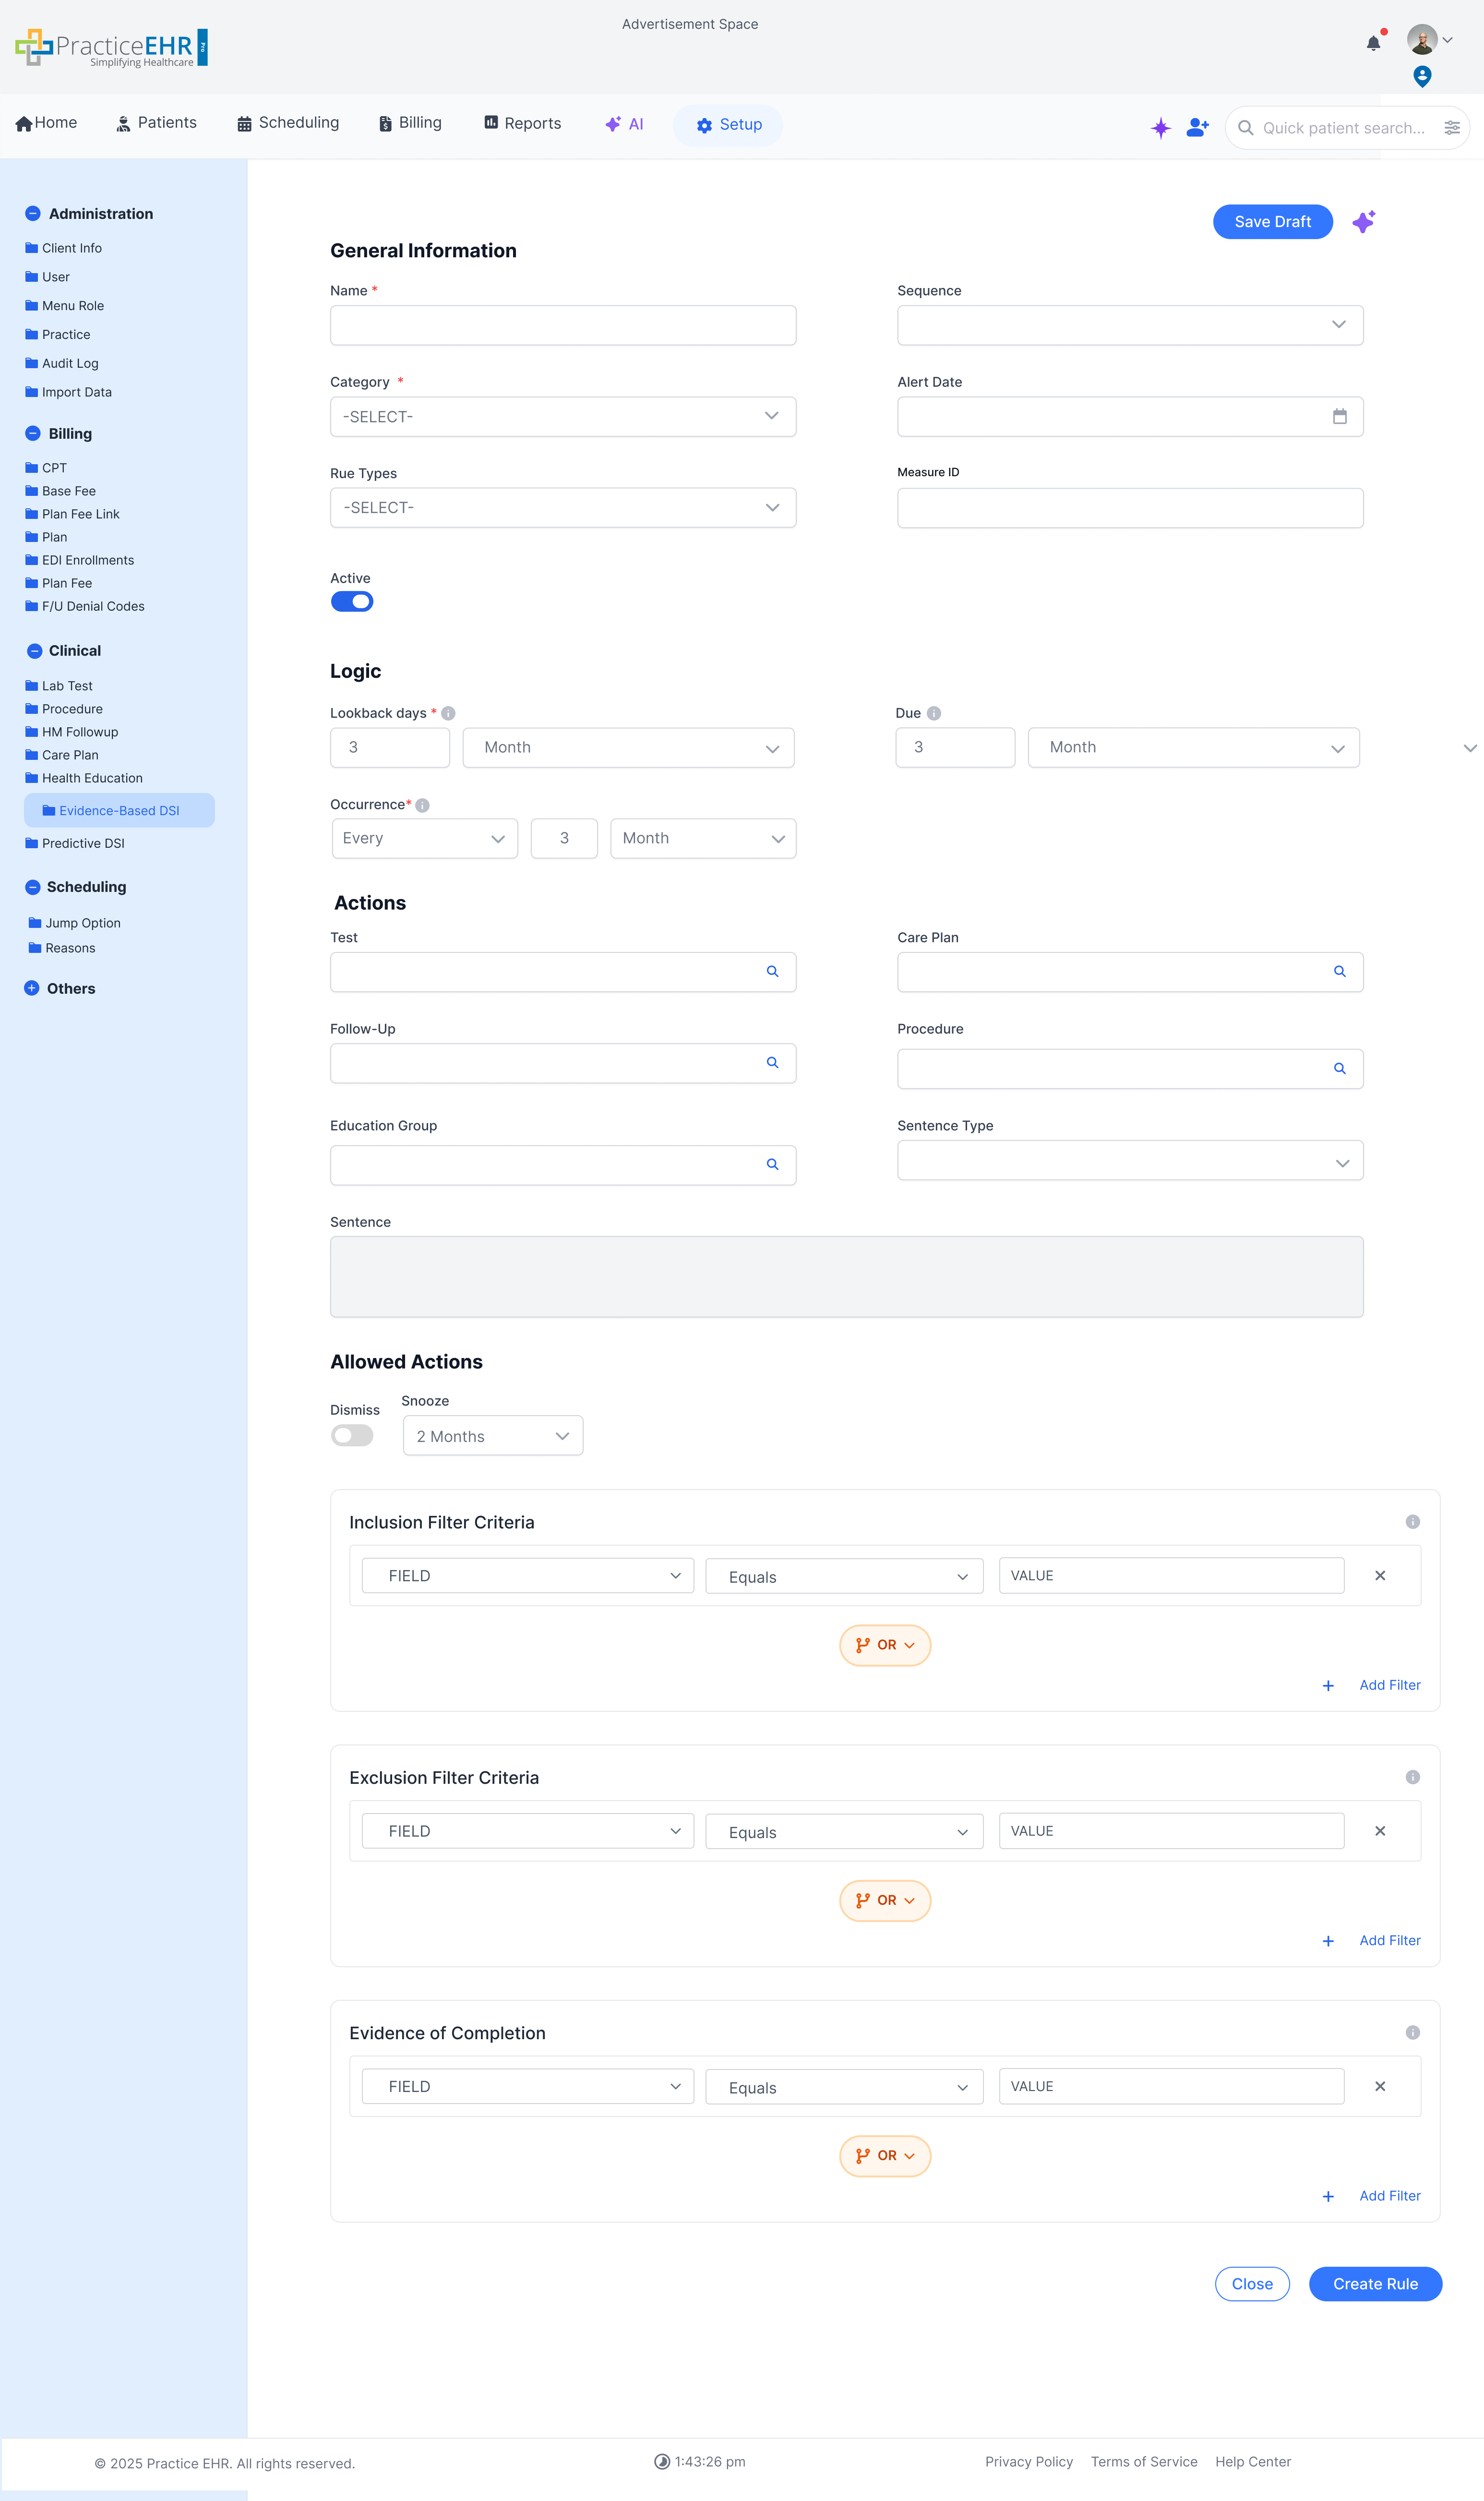
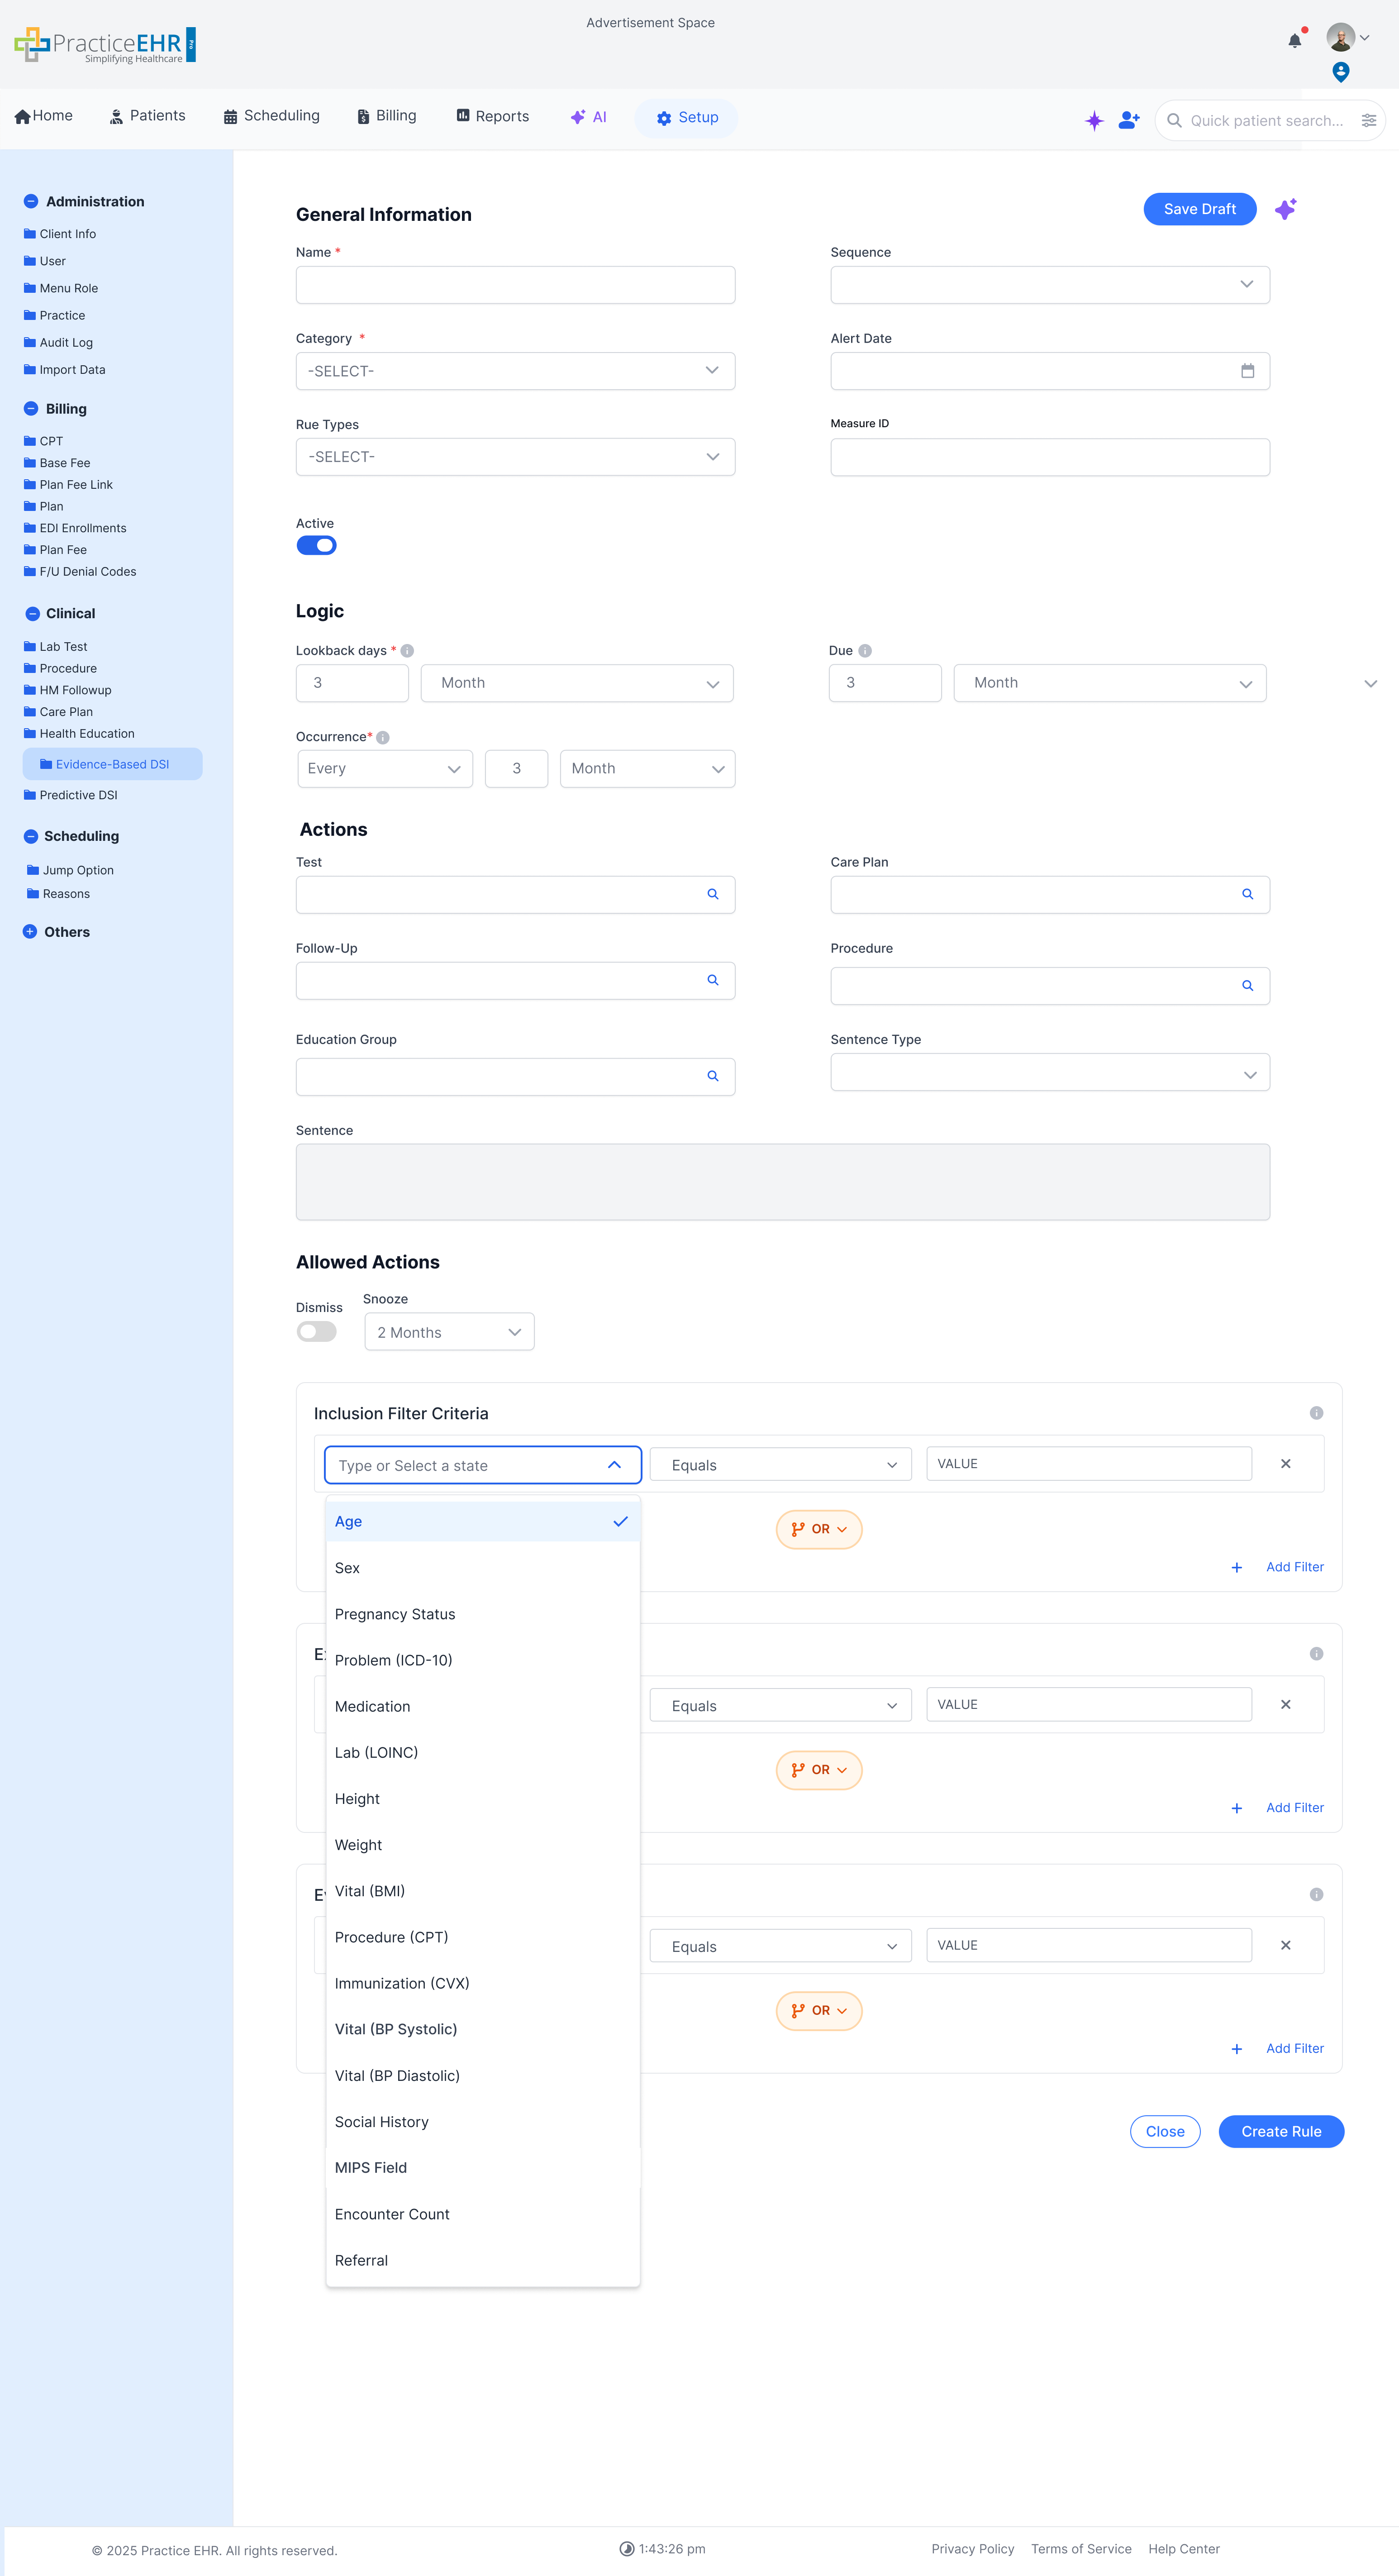
General Information - every field

  • Title (Sentence Type) - Selects the clinical note type. It works with the Sentence field to control how the EBDSI item is written into the note.
  • Sentence - The text template EBDSI uses when the provider accepts the item. The field stays disabled until a Sentence Type is chosen. If it stays blank, the item works as a reminder only and nothing is sent to Sentence View or the clinical note. If it is filled in, that text is inserted into the note when the item is accepted. In that case, the item can only be accepted when a visit is open.
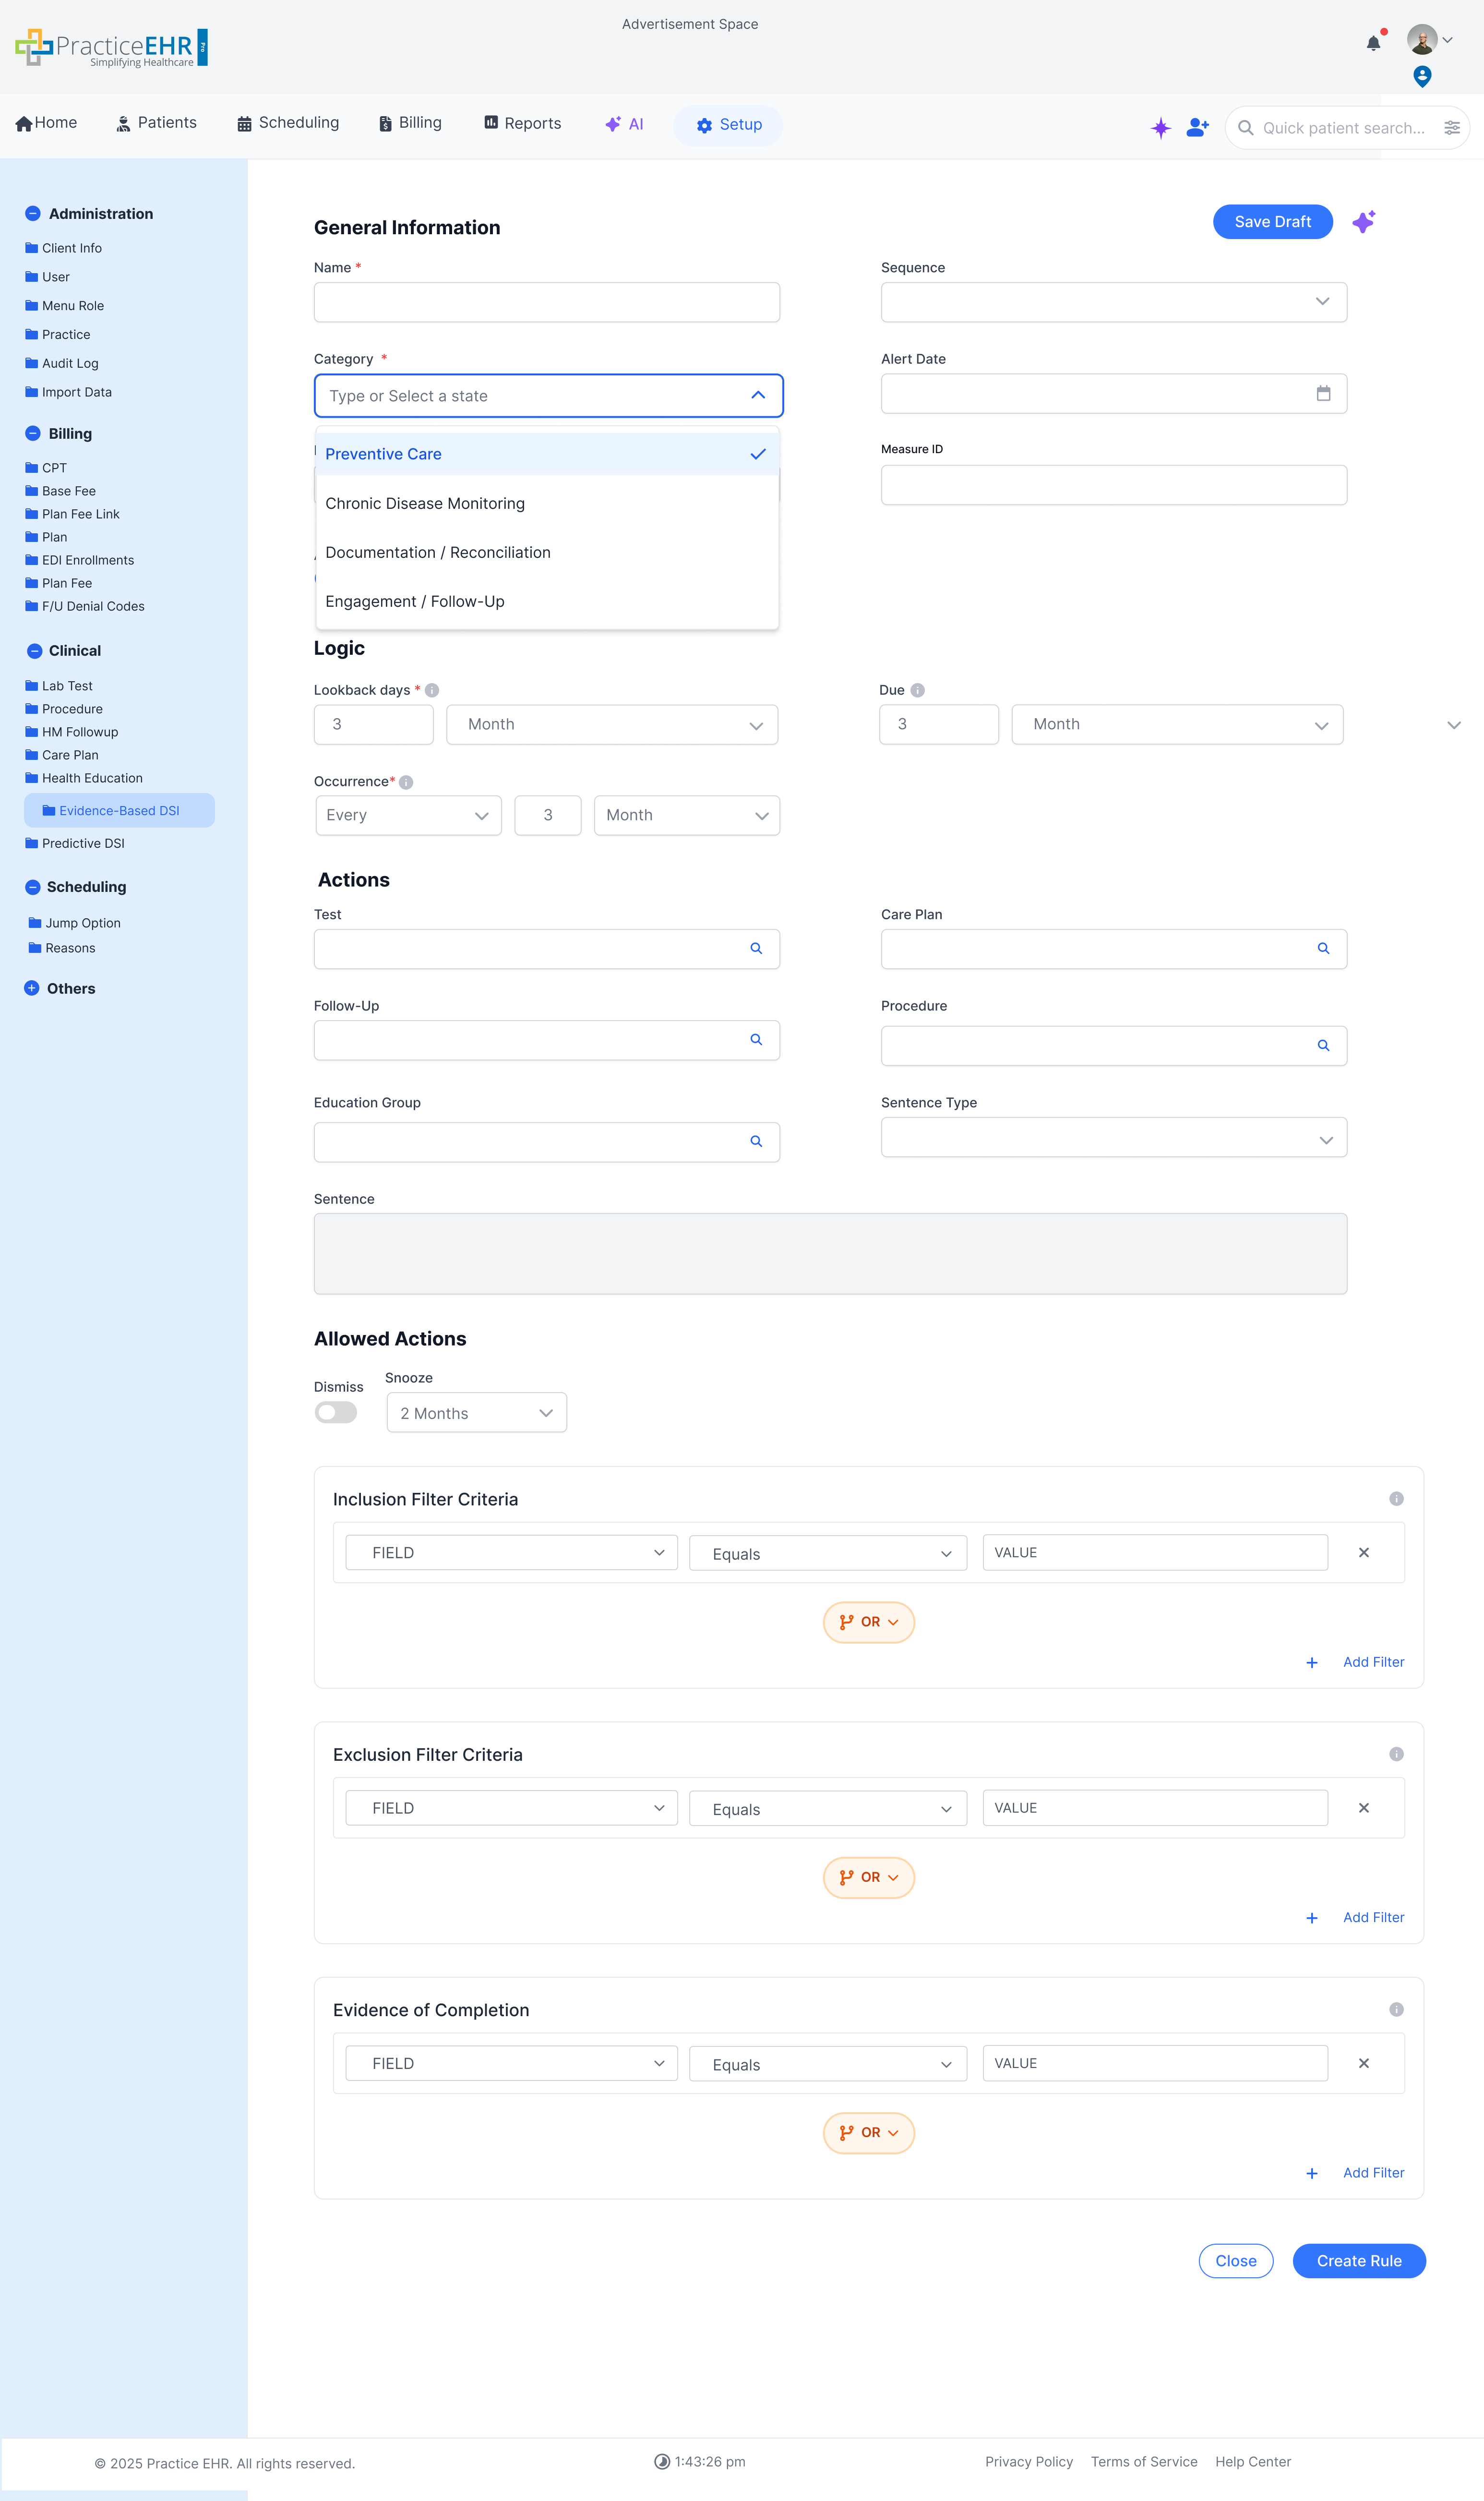
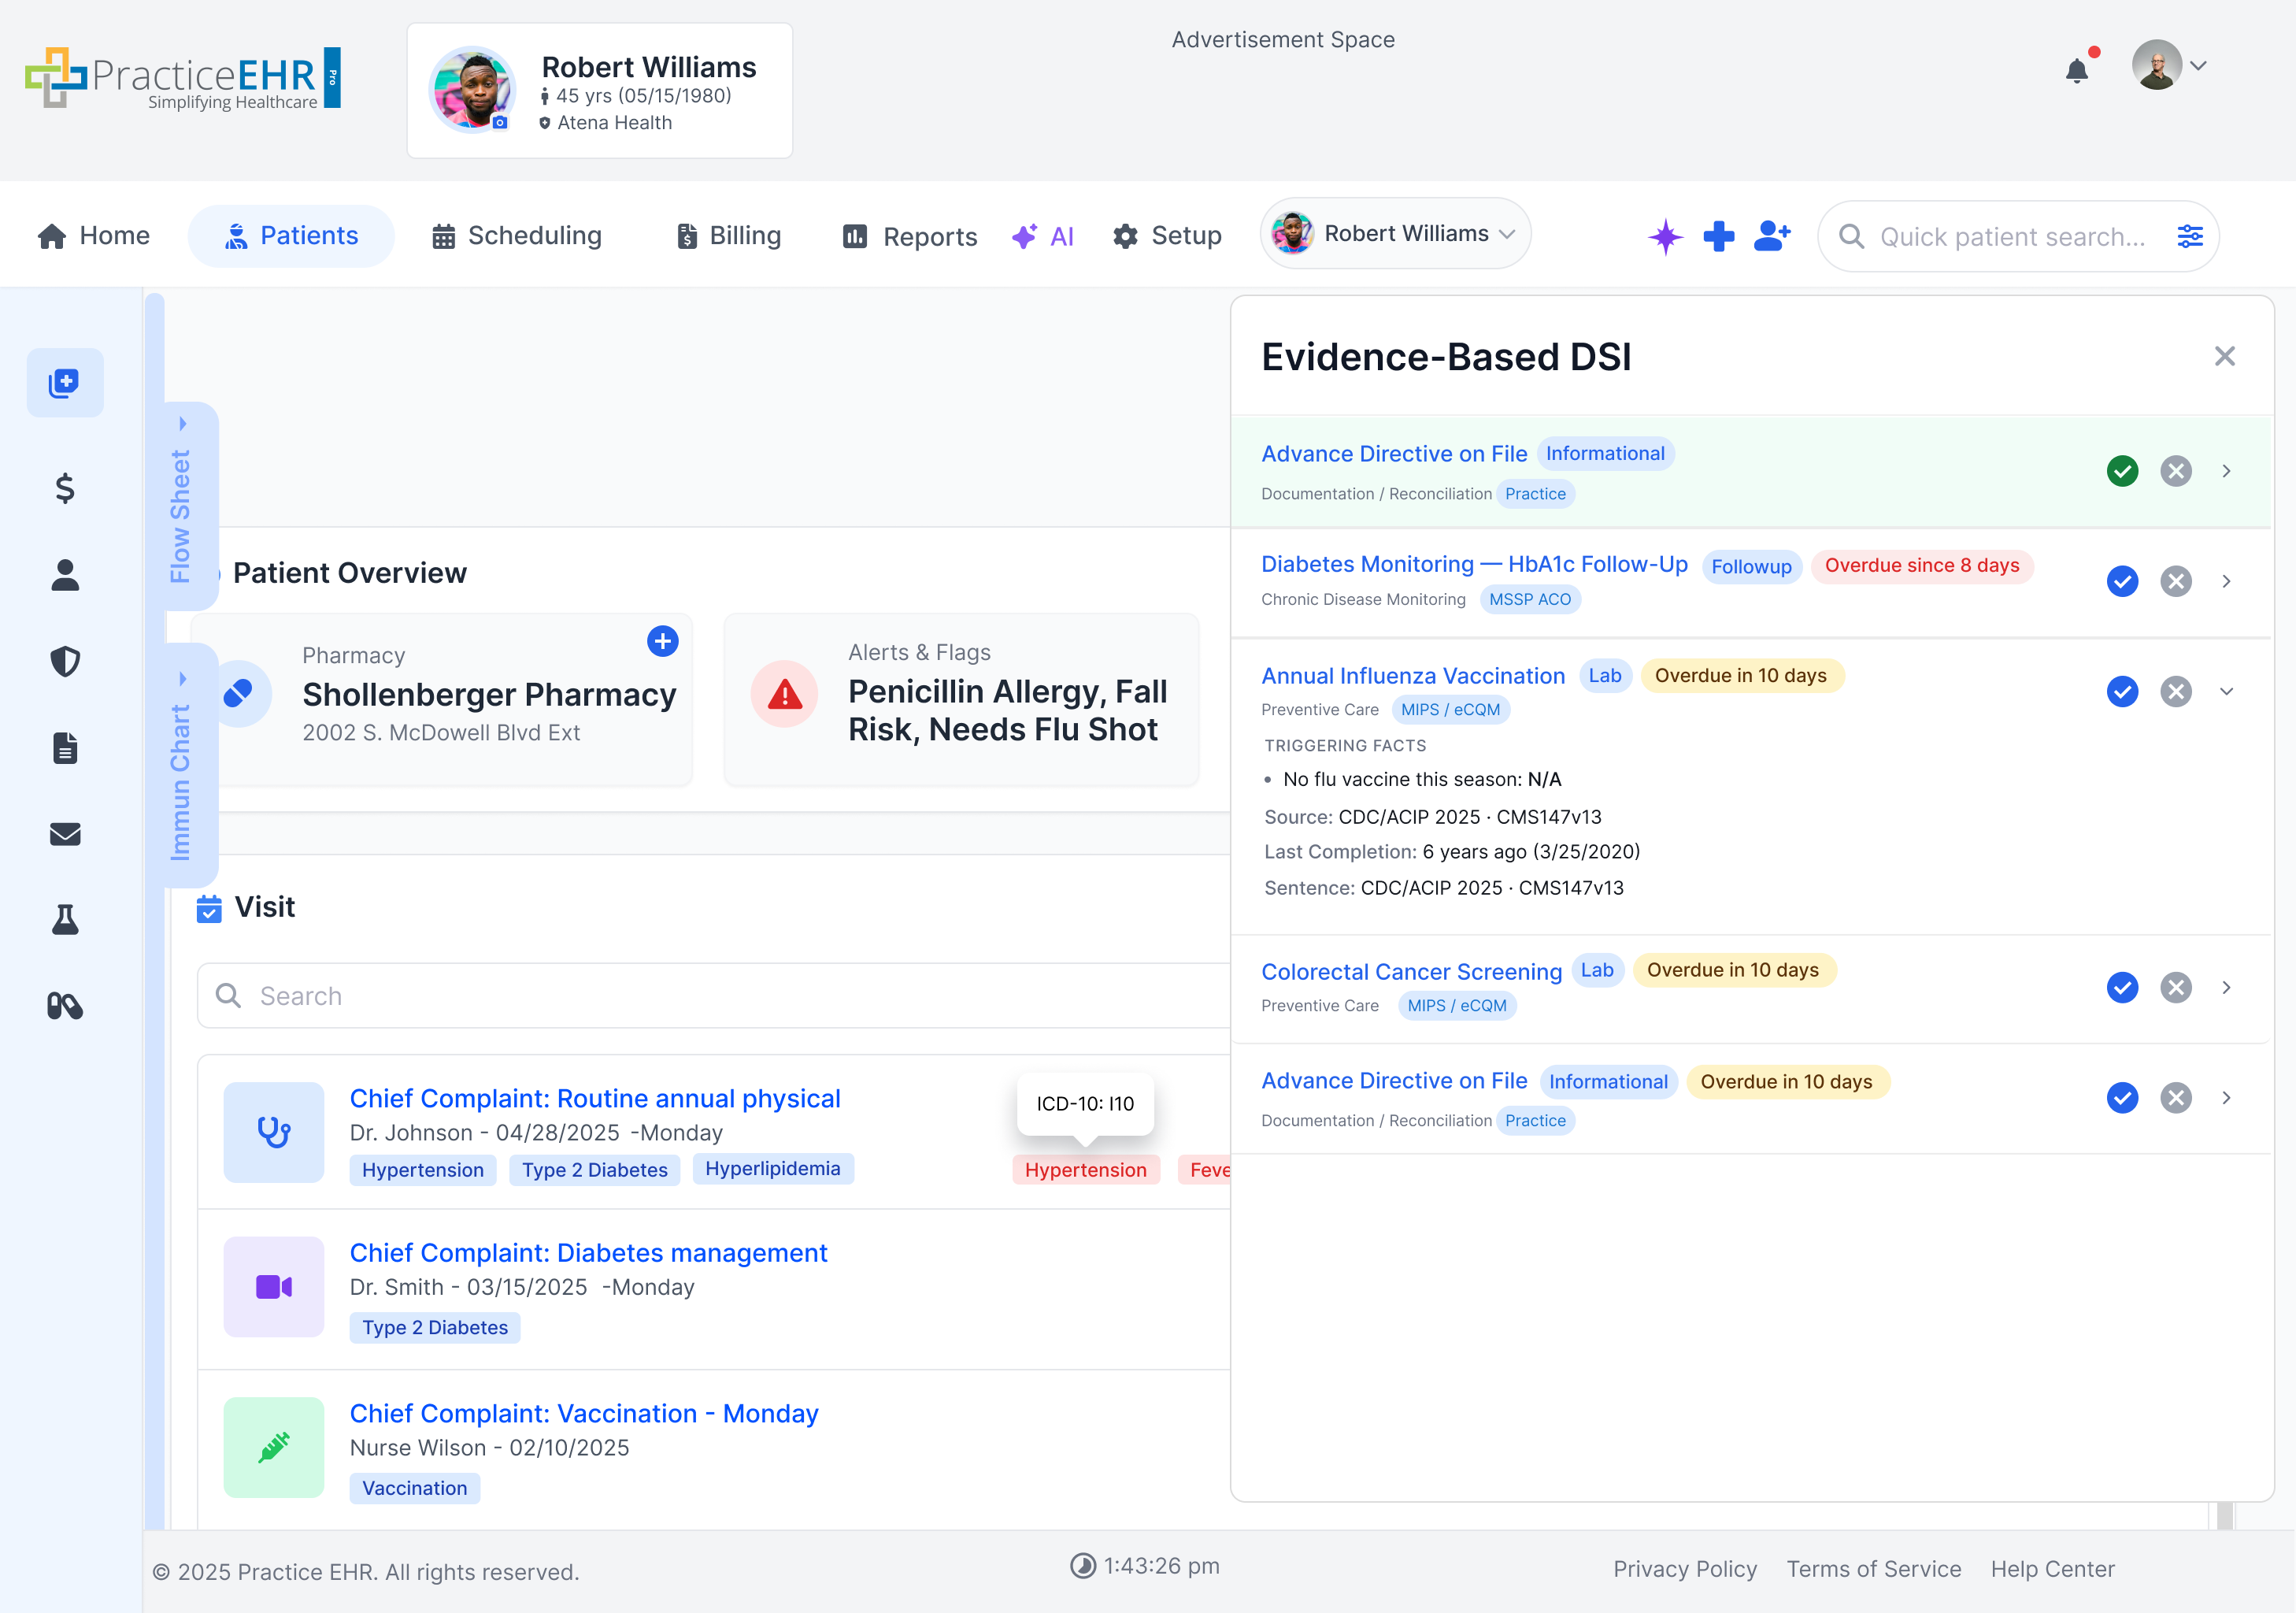
  • Category - Places the rule in one of four lanes: Preventive Care, Chronic Disease Monitoring, Documentation / Reconciliation, or Engagement / Follow-Up. This controls the panel label, available actions, and priority weight.
  • Alert Date - Sets the date when the alert should first appear. Use this for awareness-only rules that do not require a provider response.
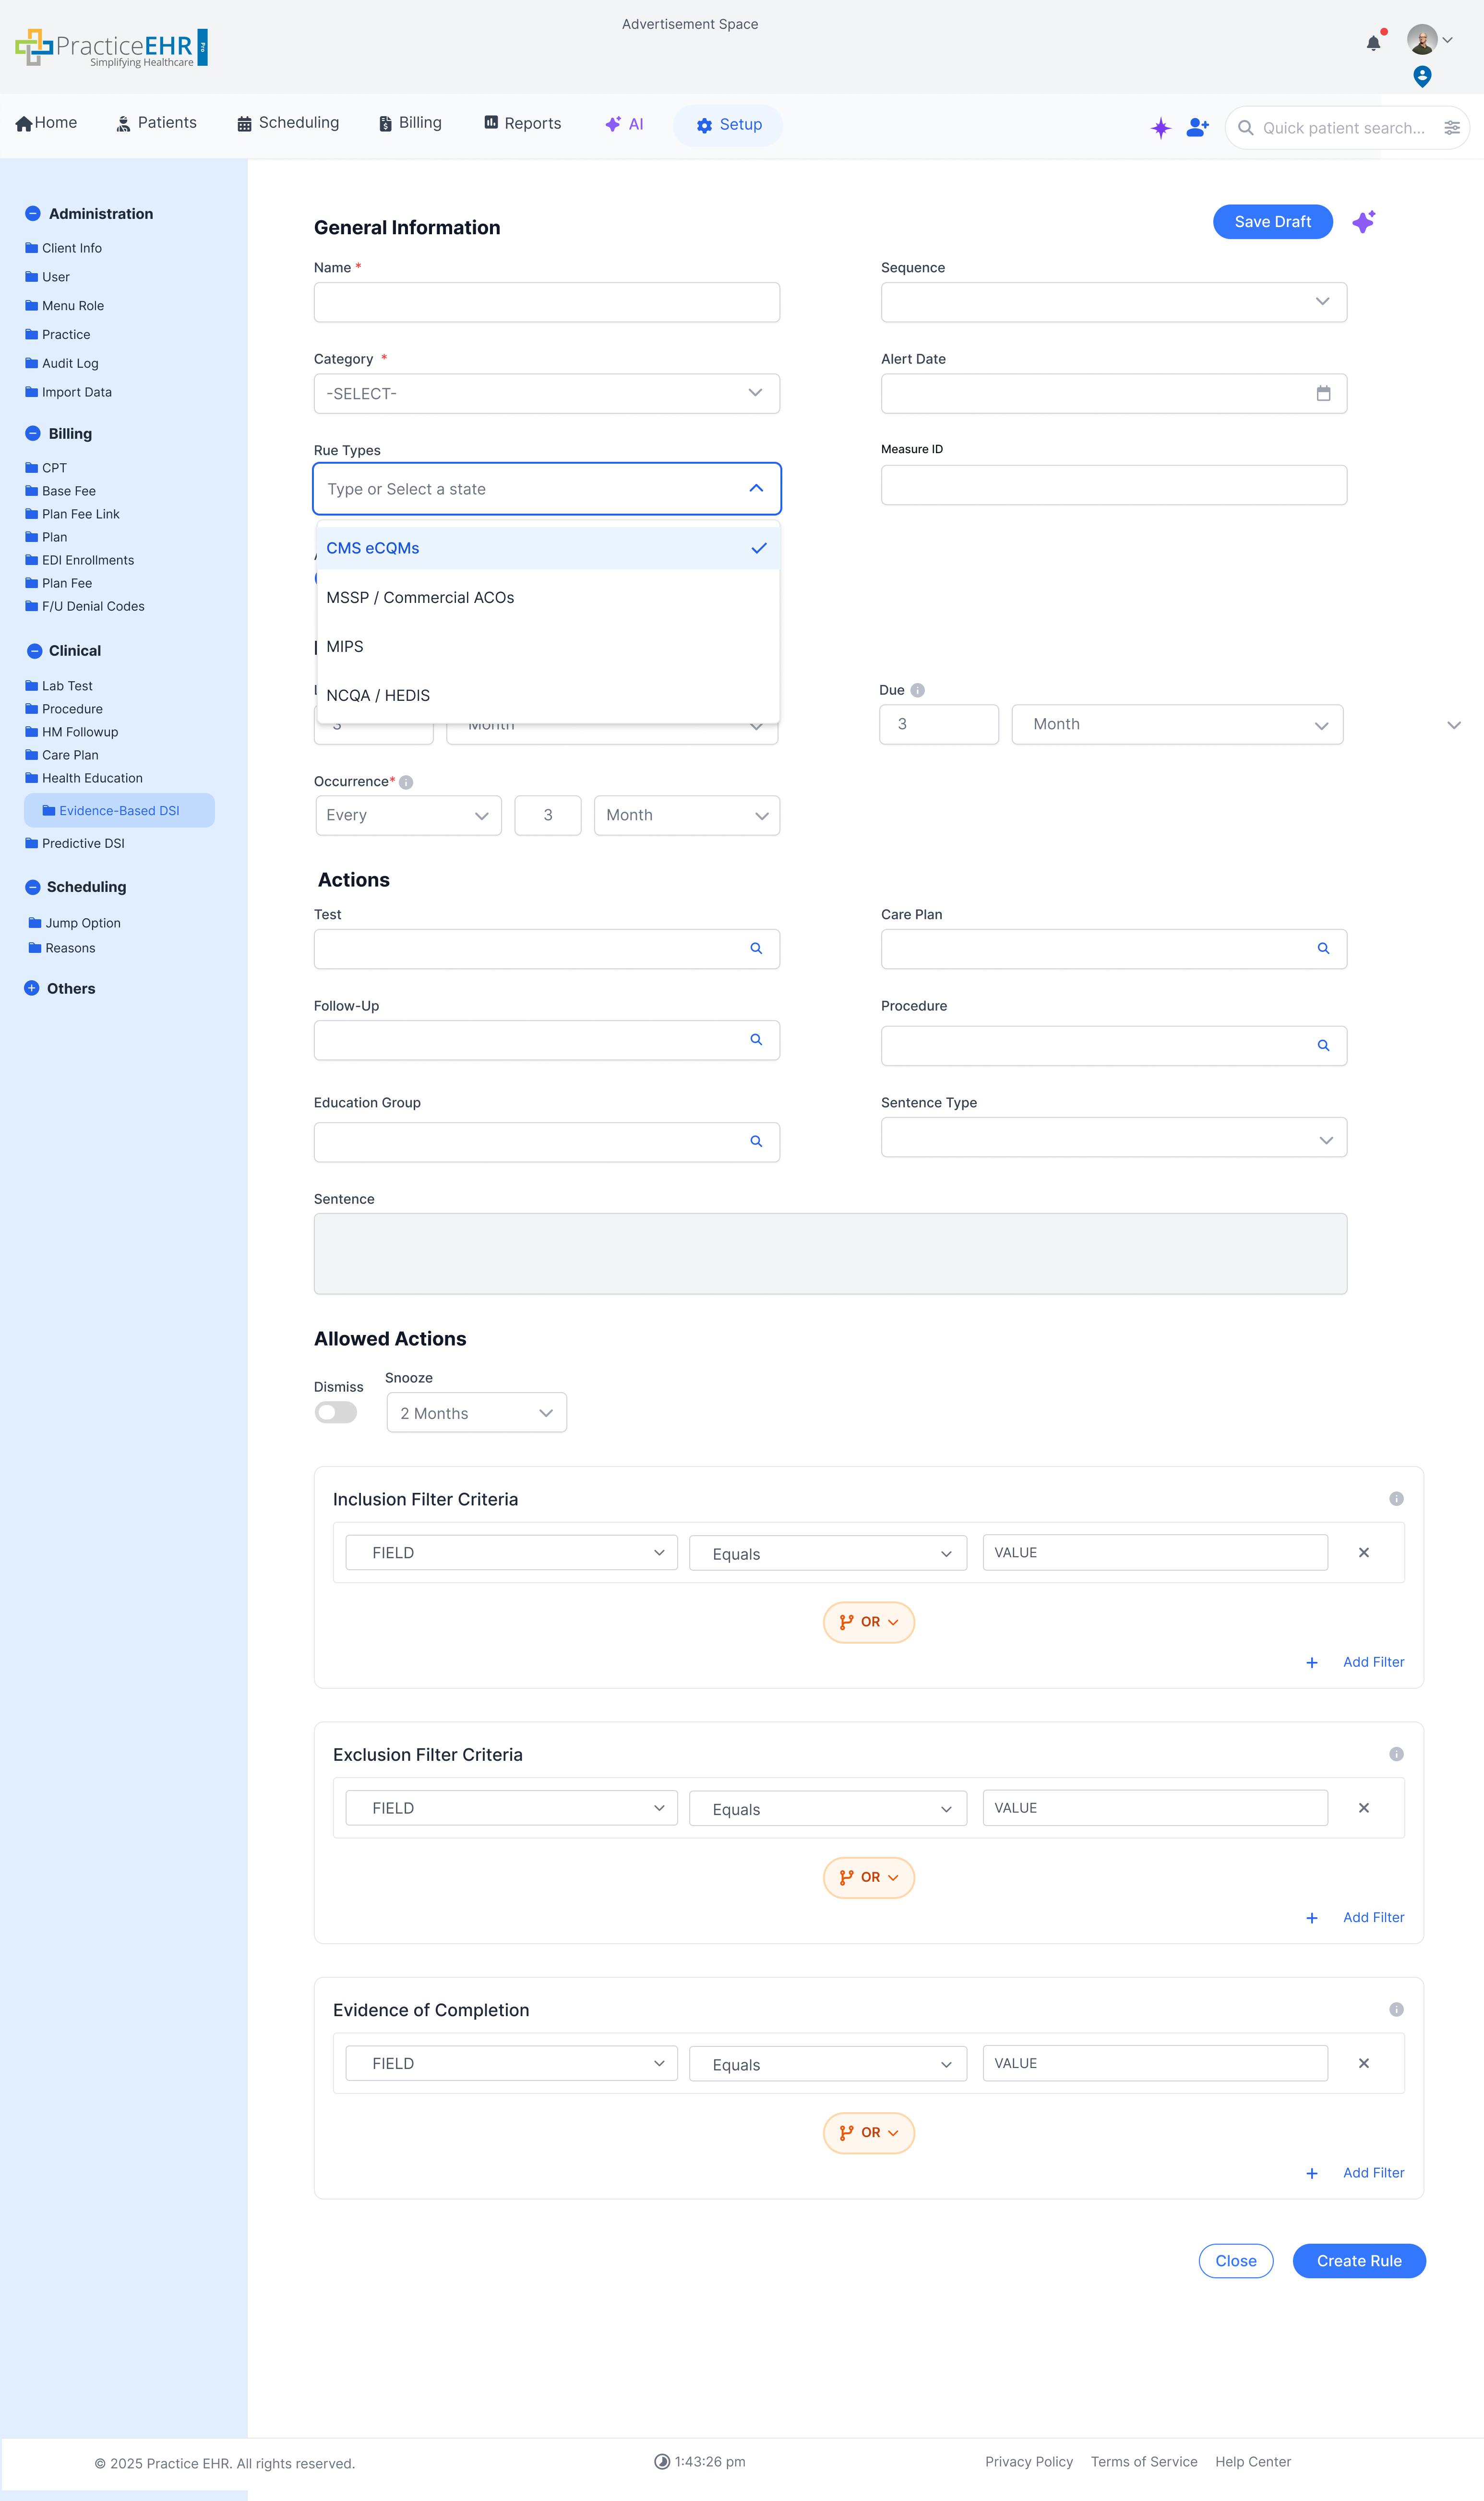
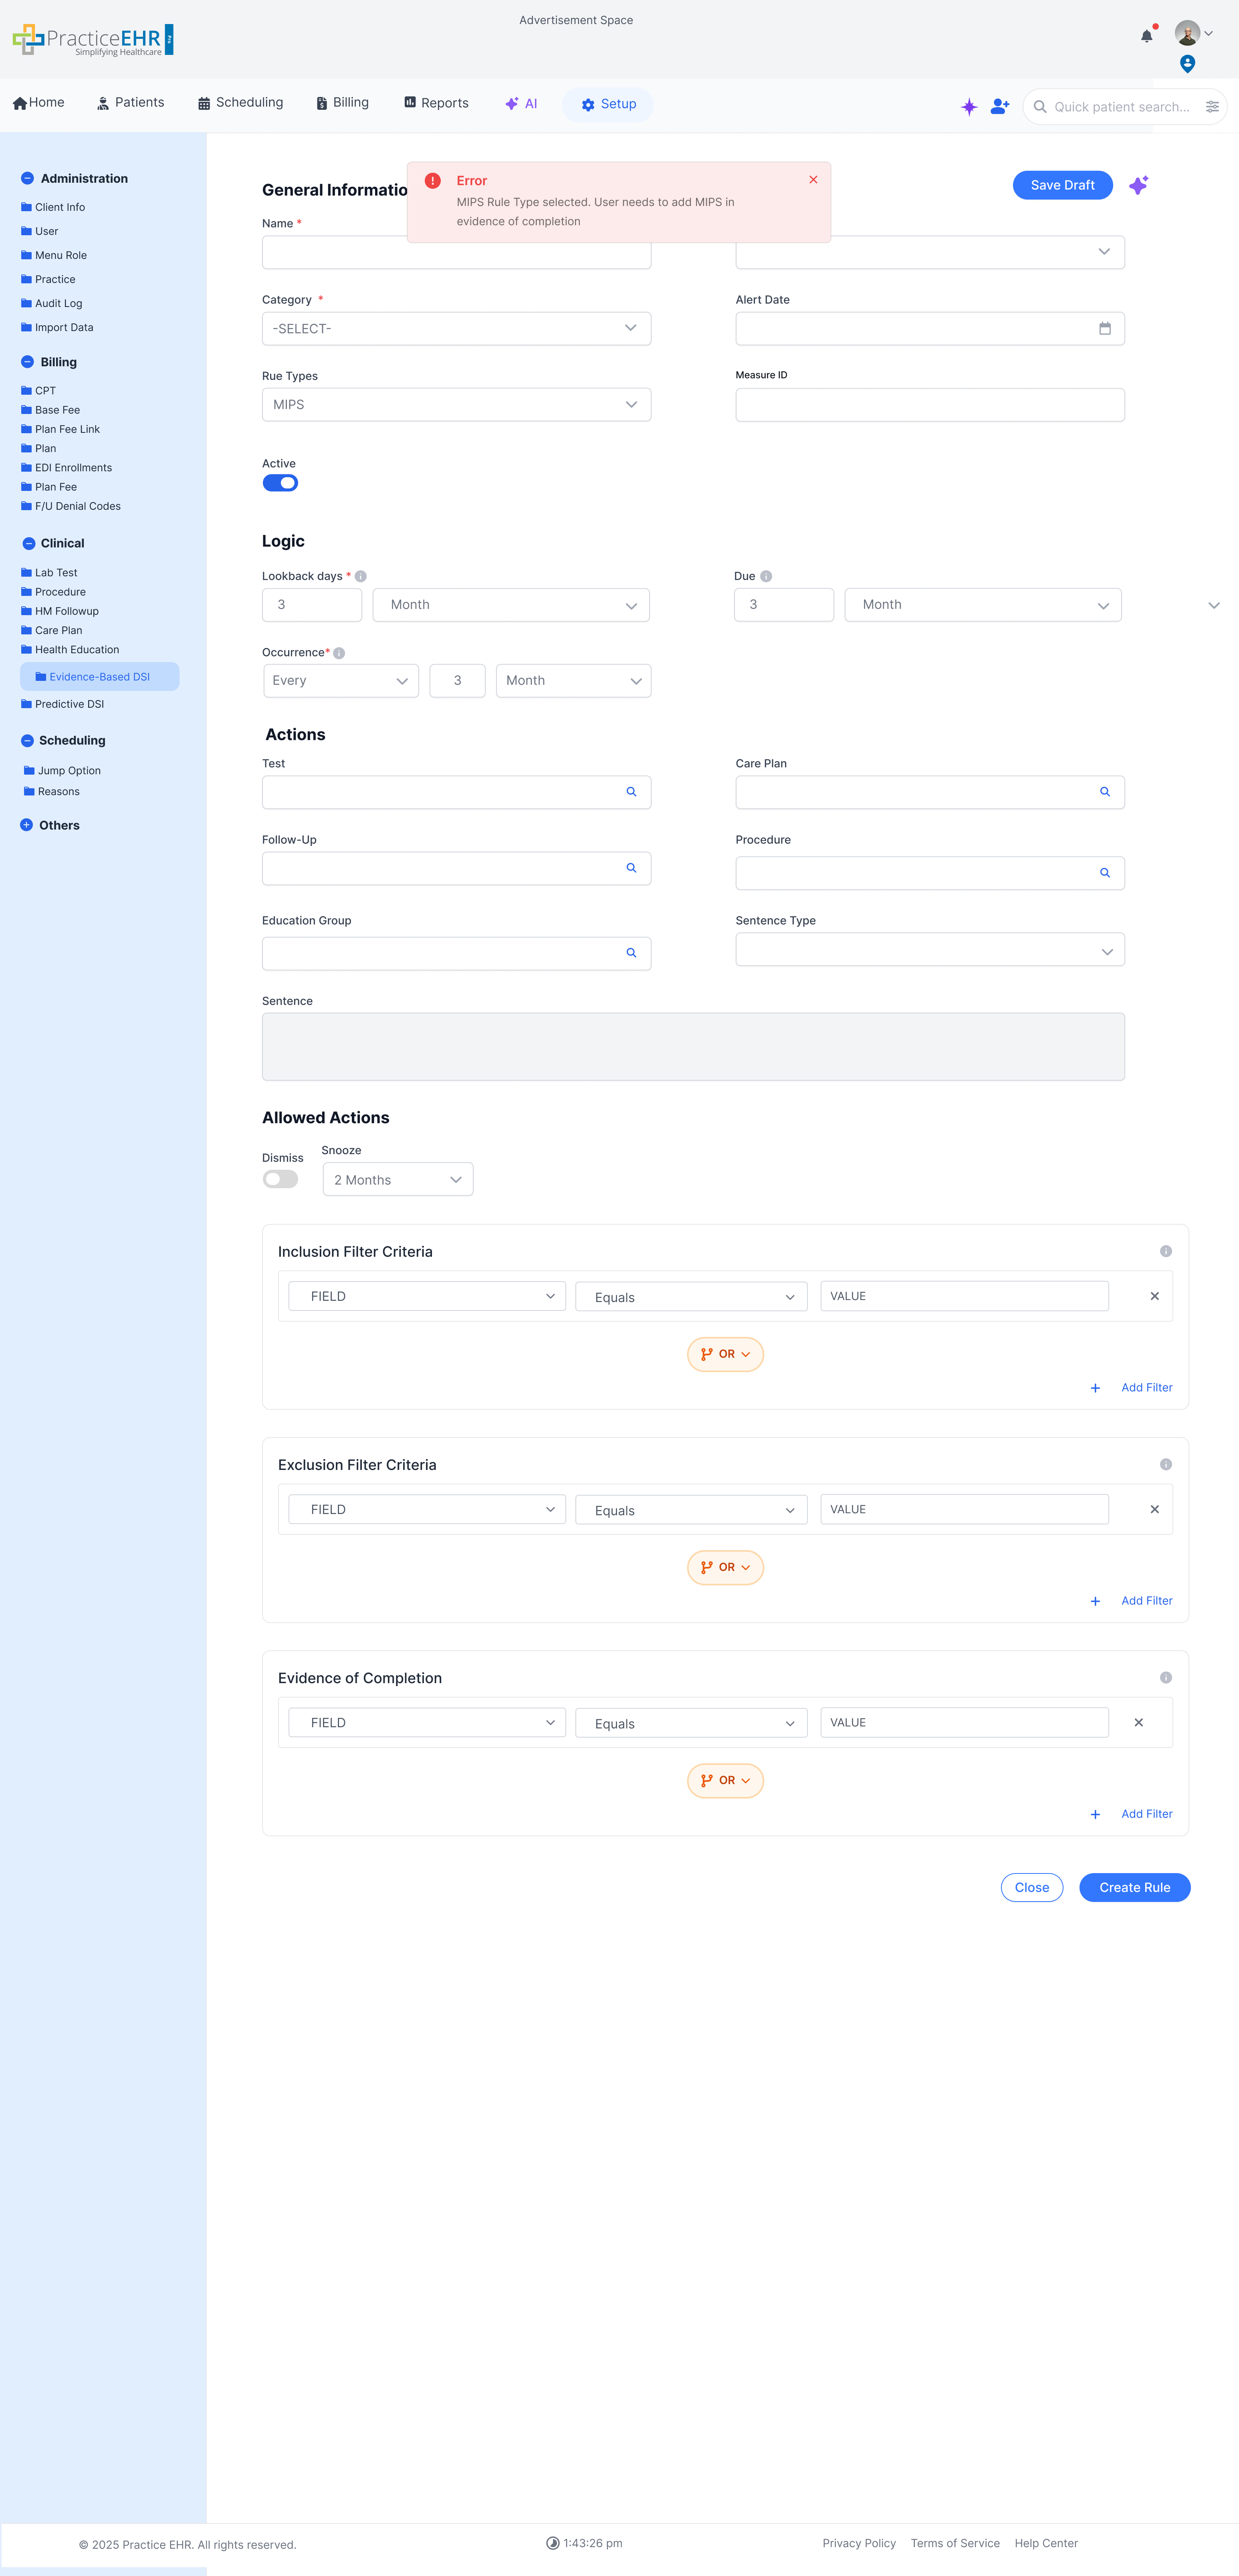
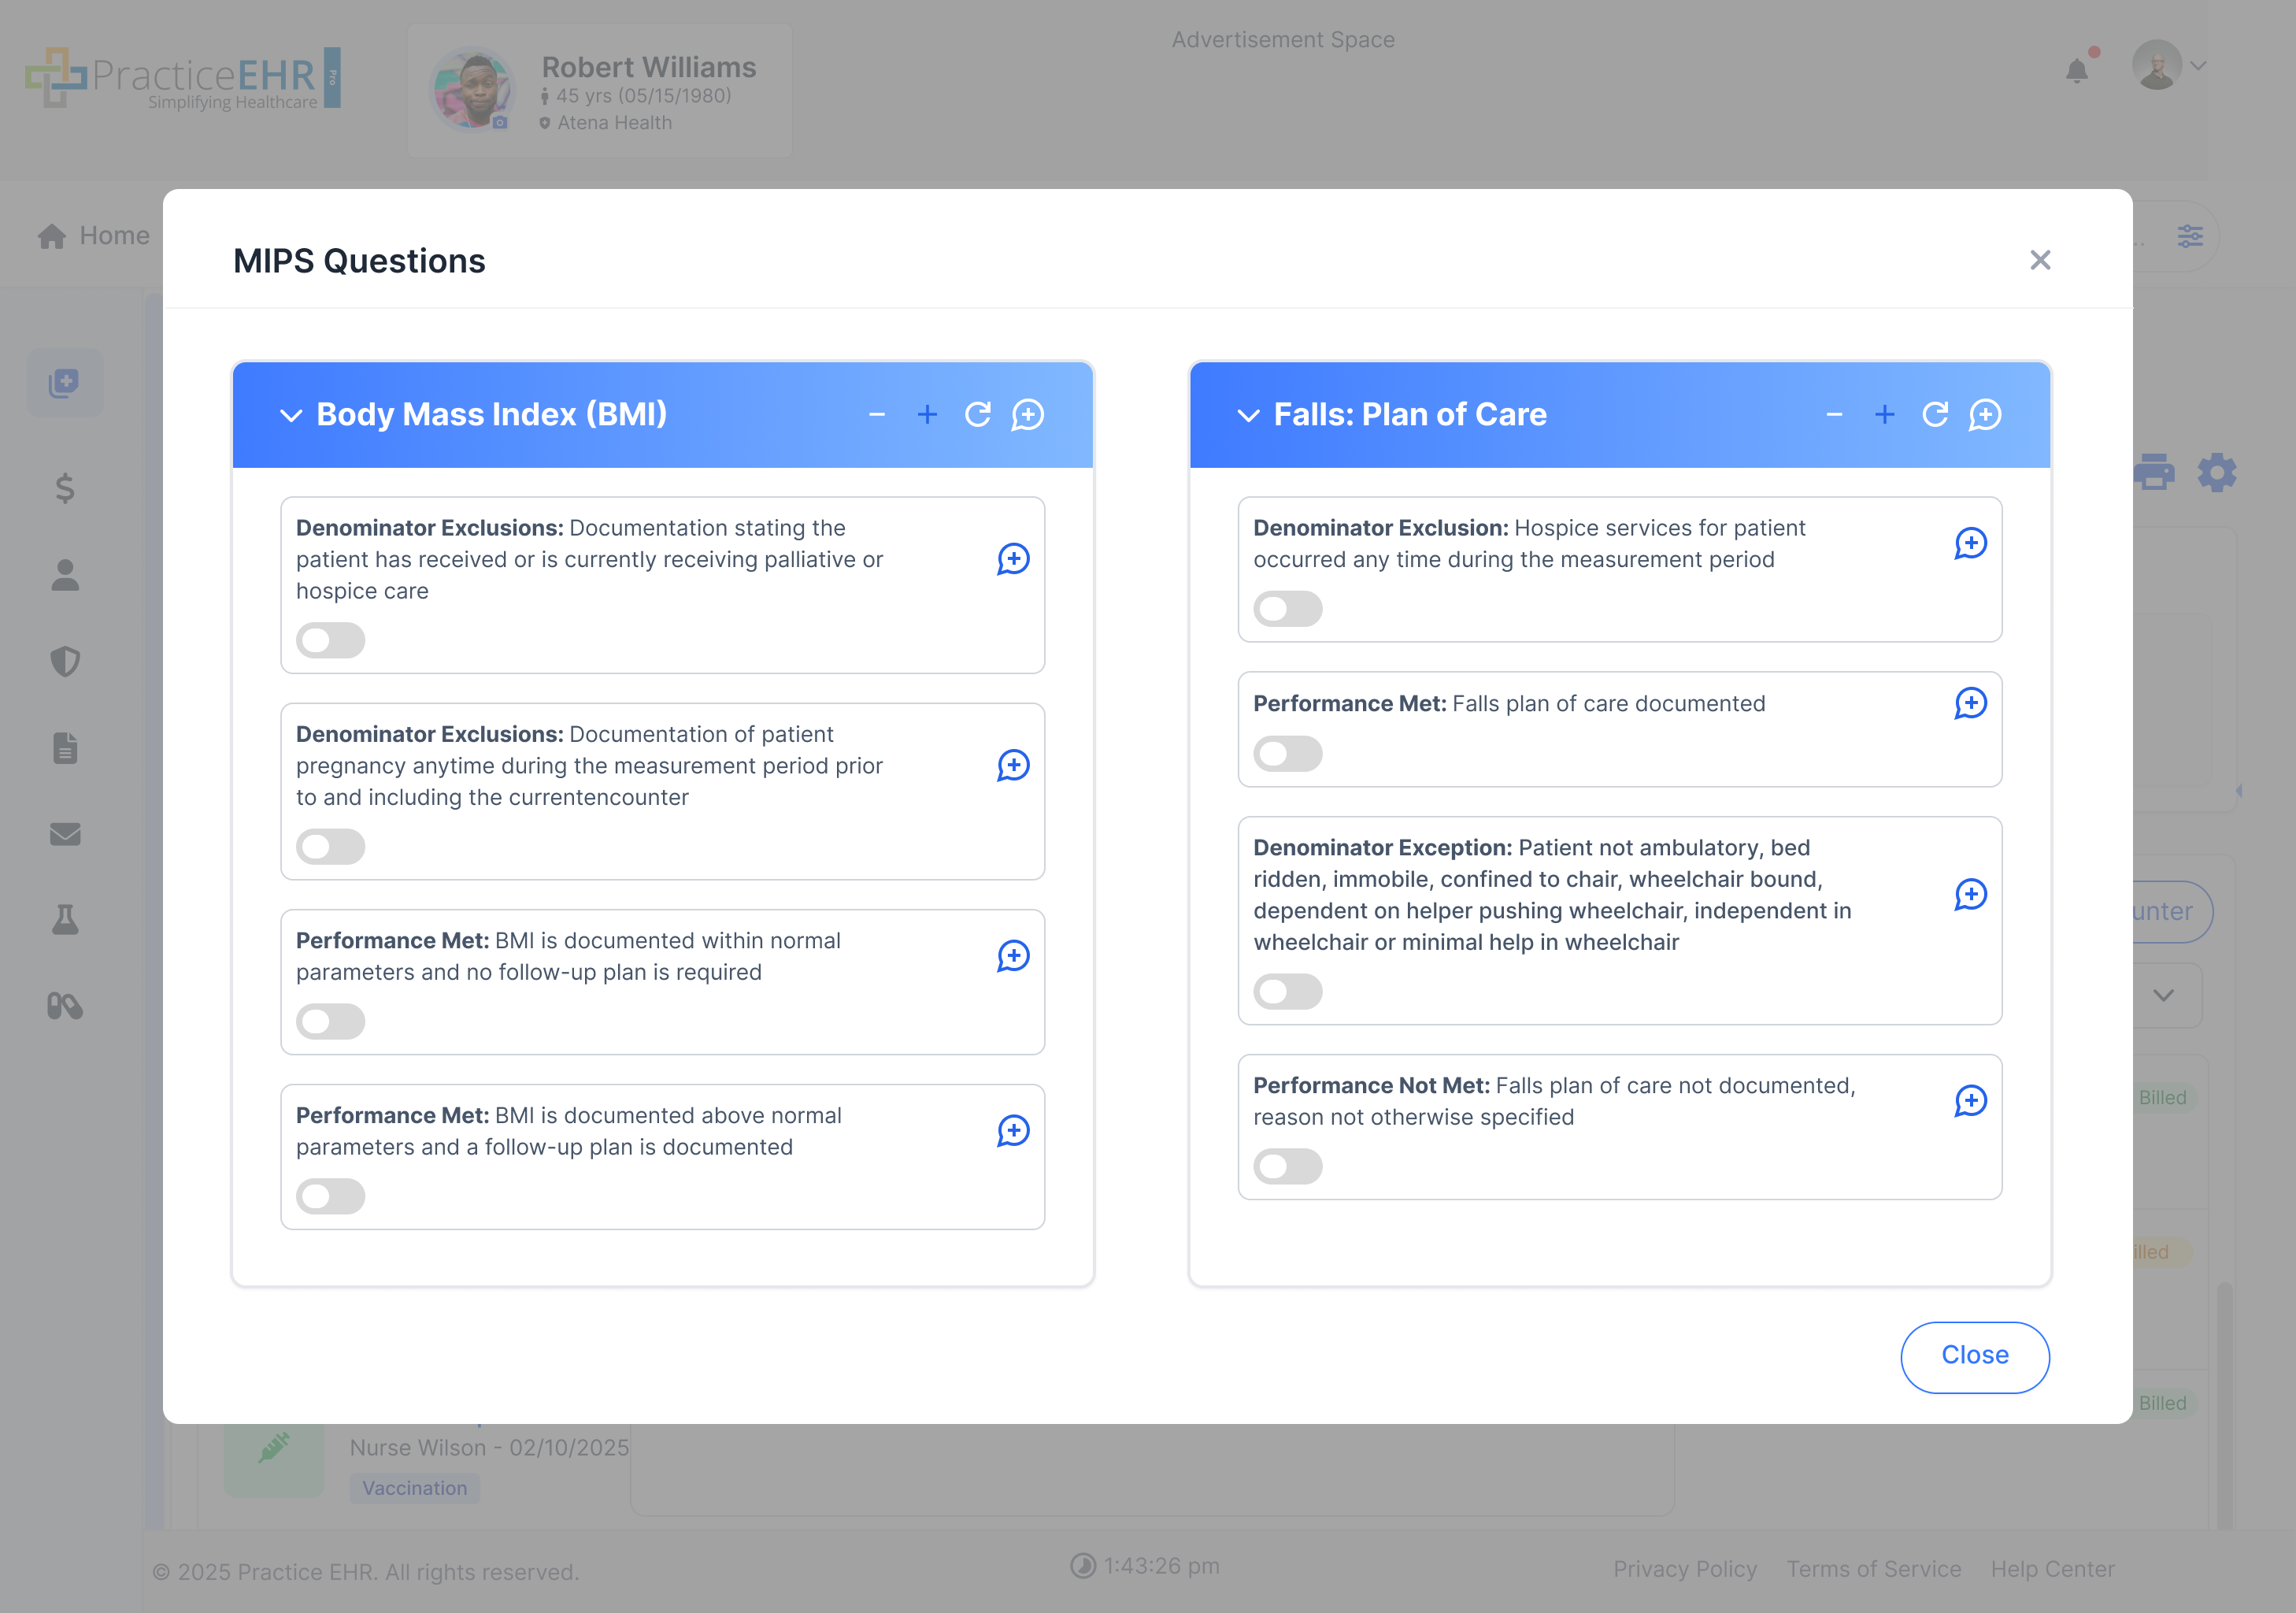
  • Rule Type - Identifies the guideline family, quality program, or internal rule this item belongs to (for example, USPSTF, CMS eCQM, ADA, or an internal practice rule). It supports auditability and ACO / MIPS defensibility.
  • Measure ID - Unique identifier for a quality measure (e.g., CMS130v12). Required when Rule Type is a quality program. Drives the program badge shown in the panel and links the rule to ACO / MIPS / eCQM reporting.
  • Sequence - Runs automatically when an EBDSI item is accepted. For more on sequences, see Workflow Automation.
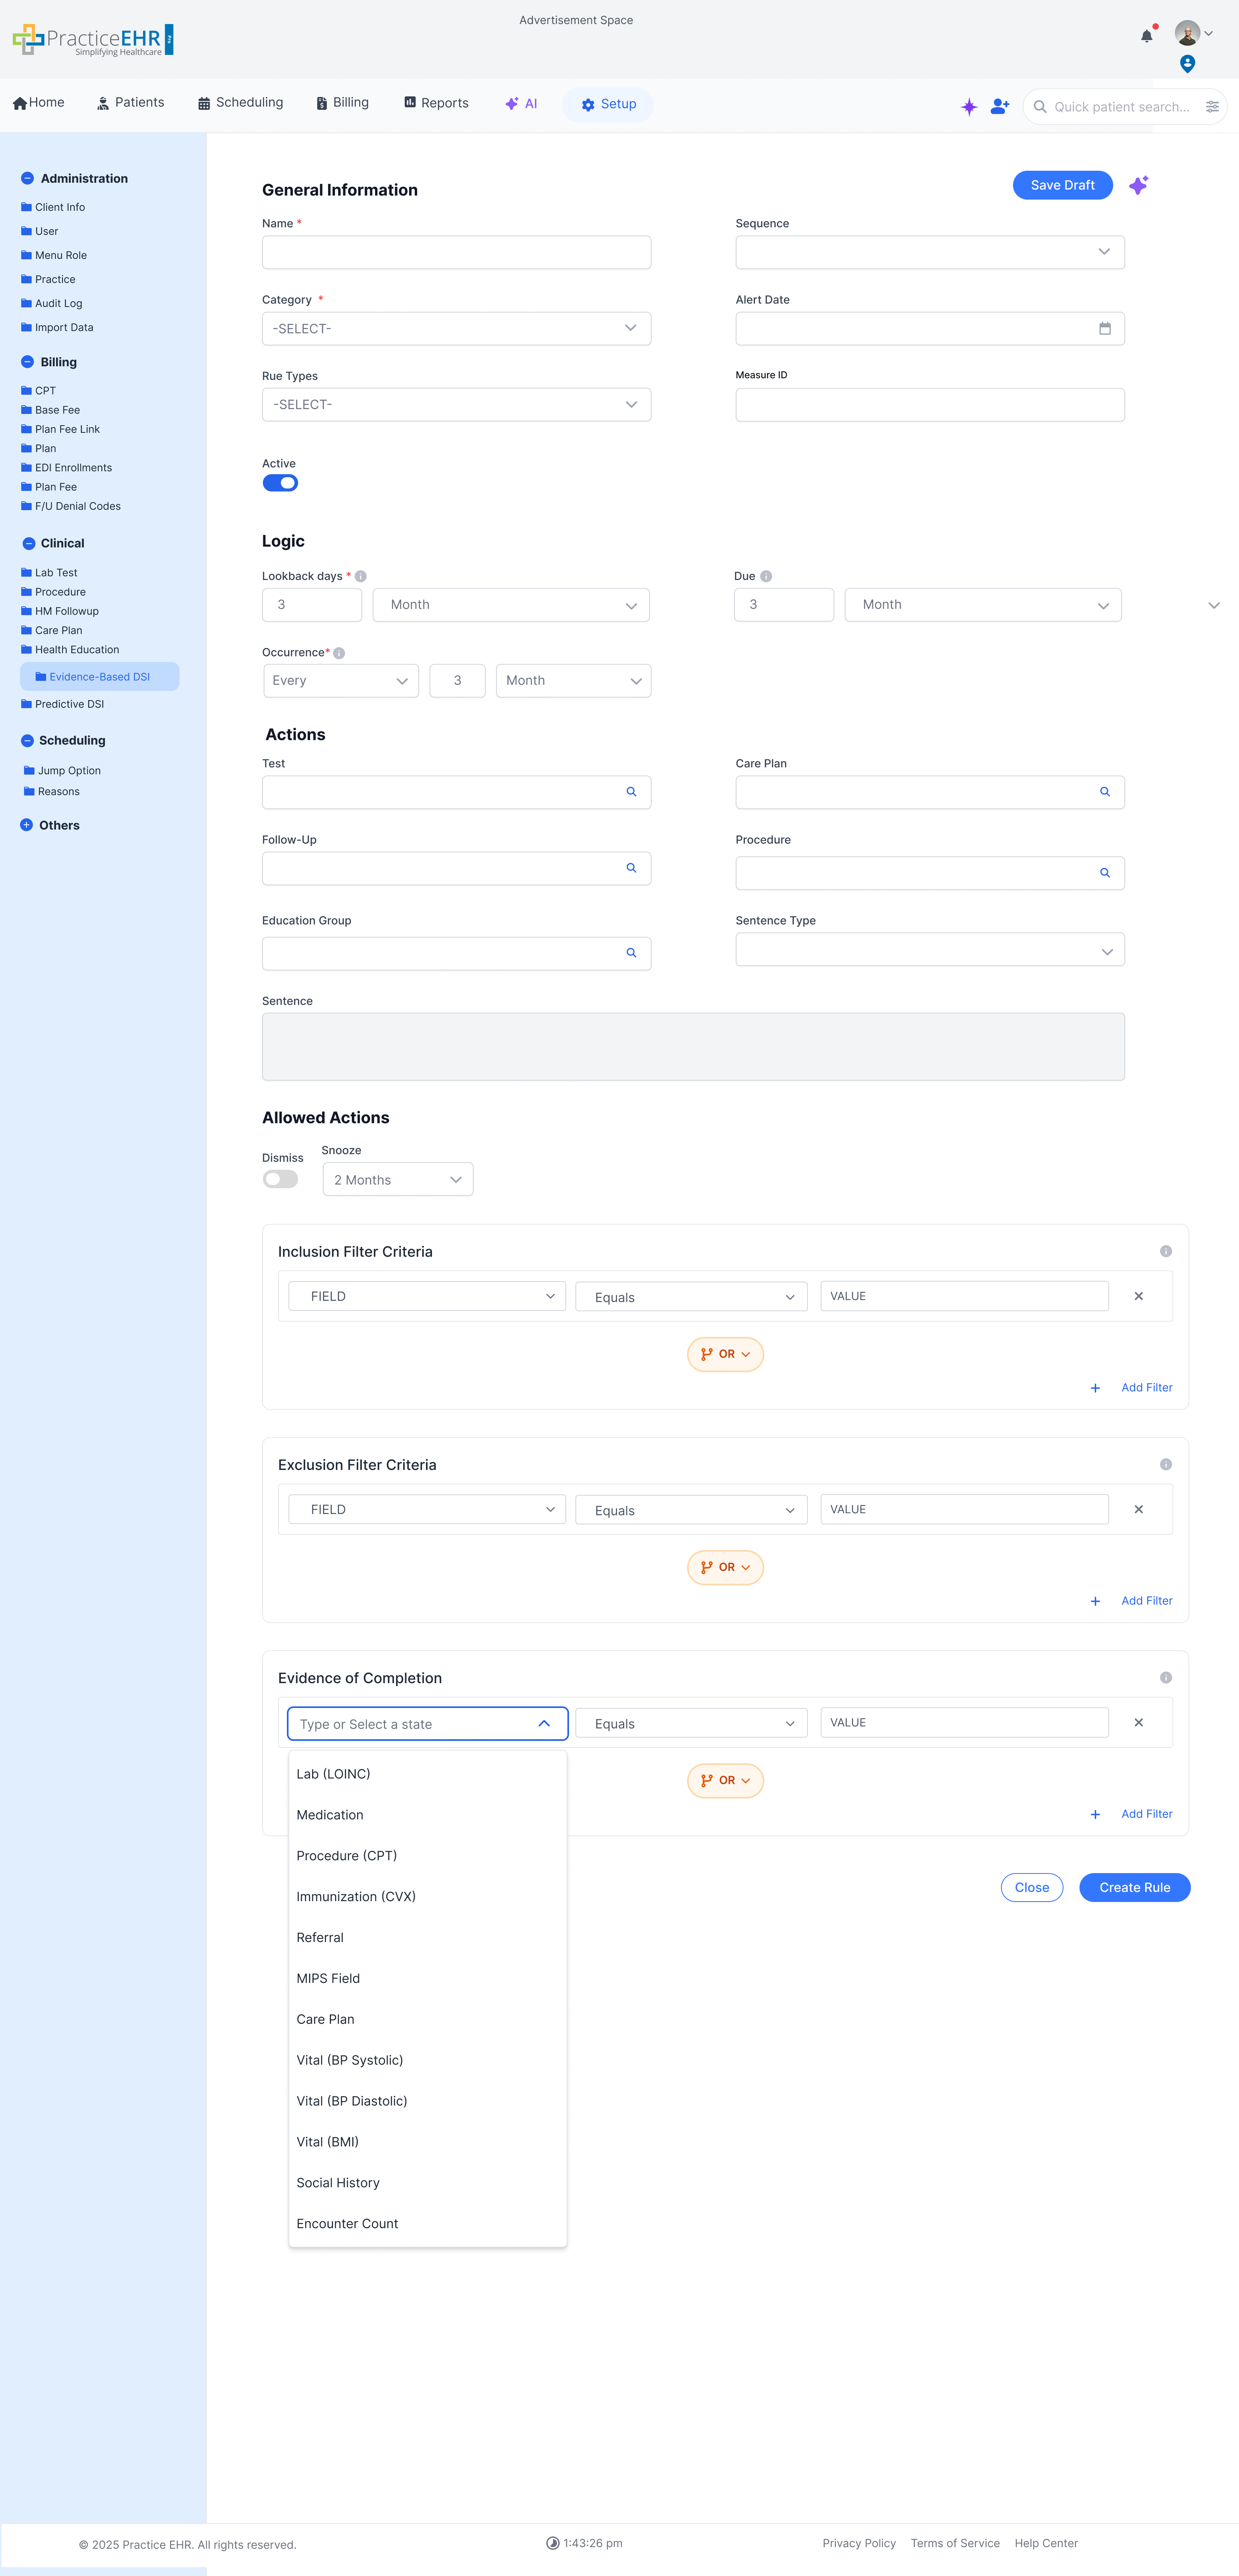
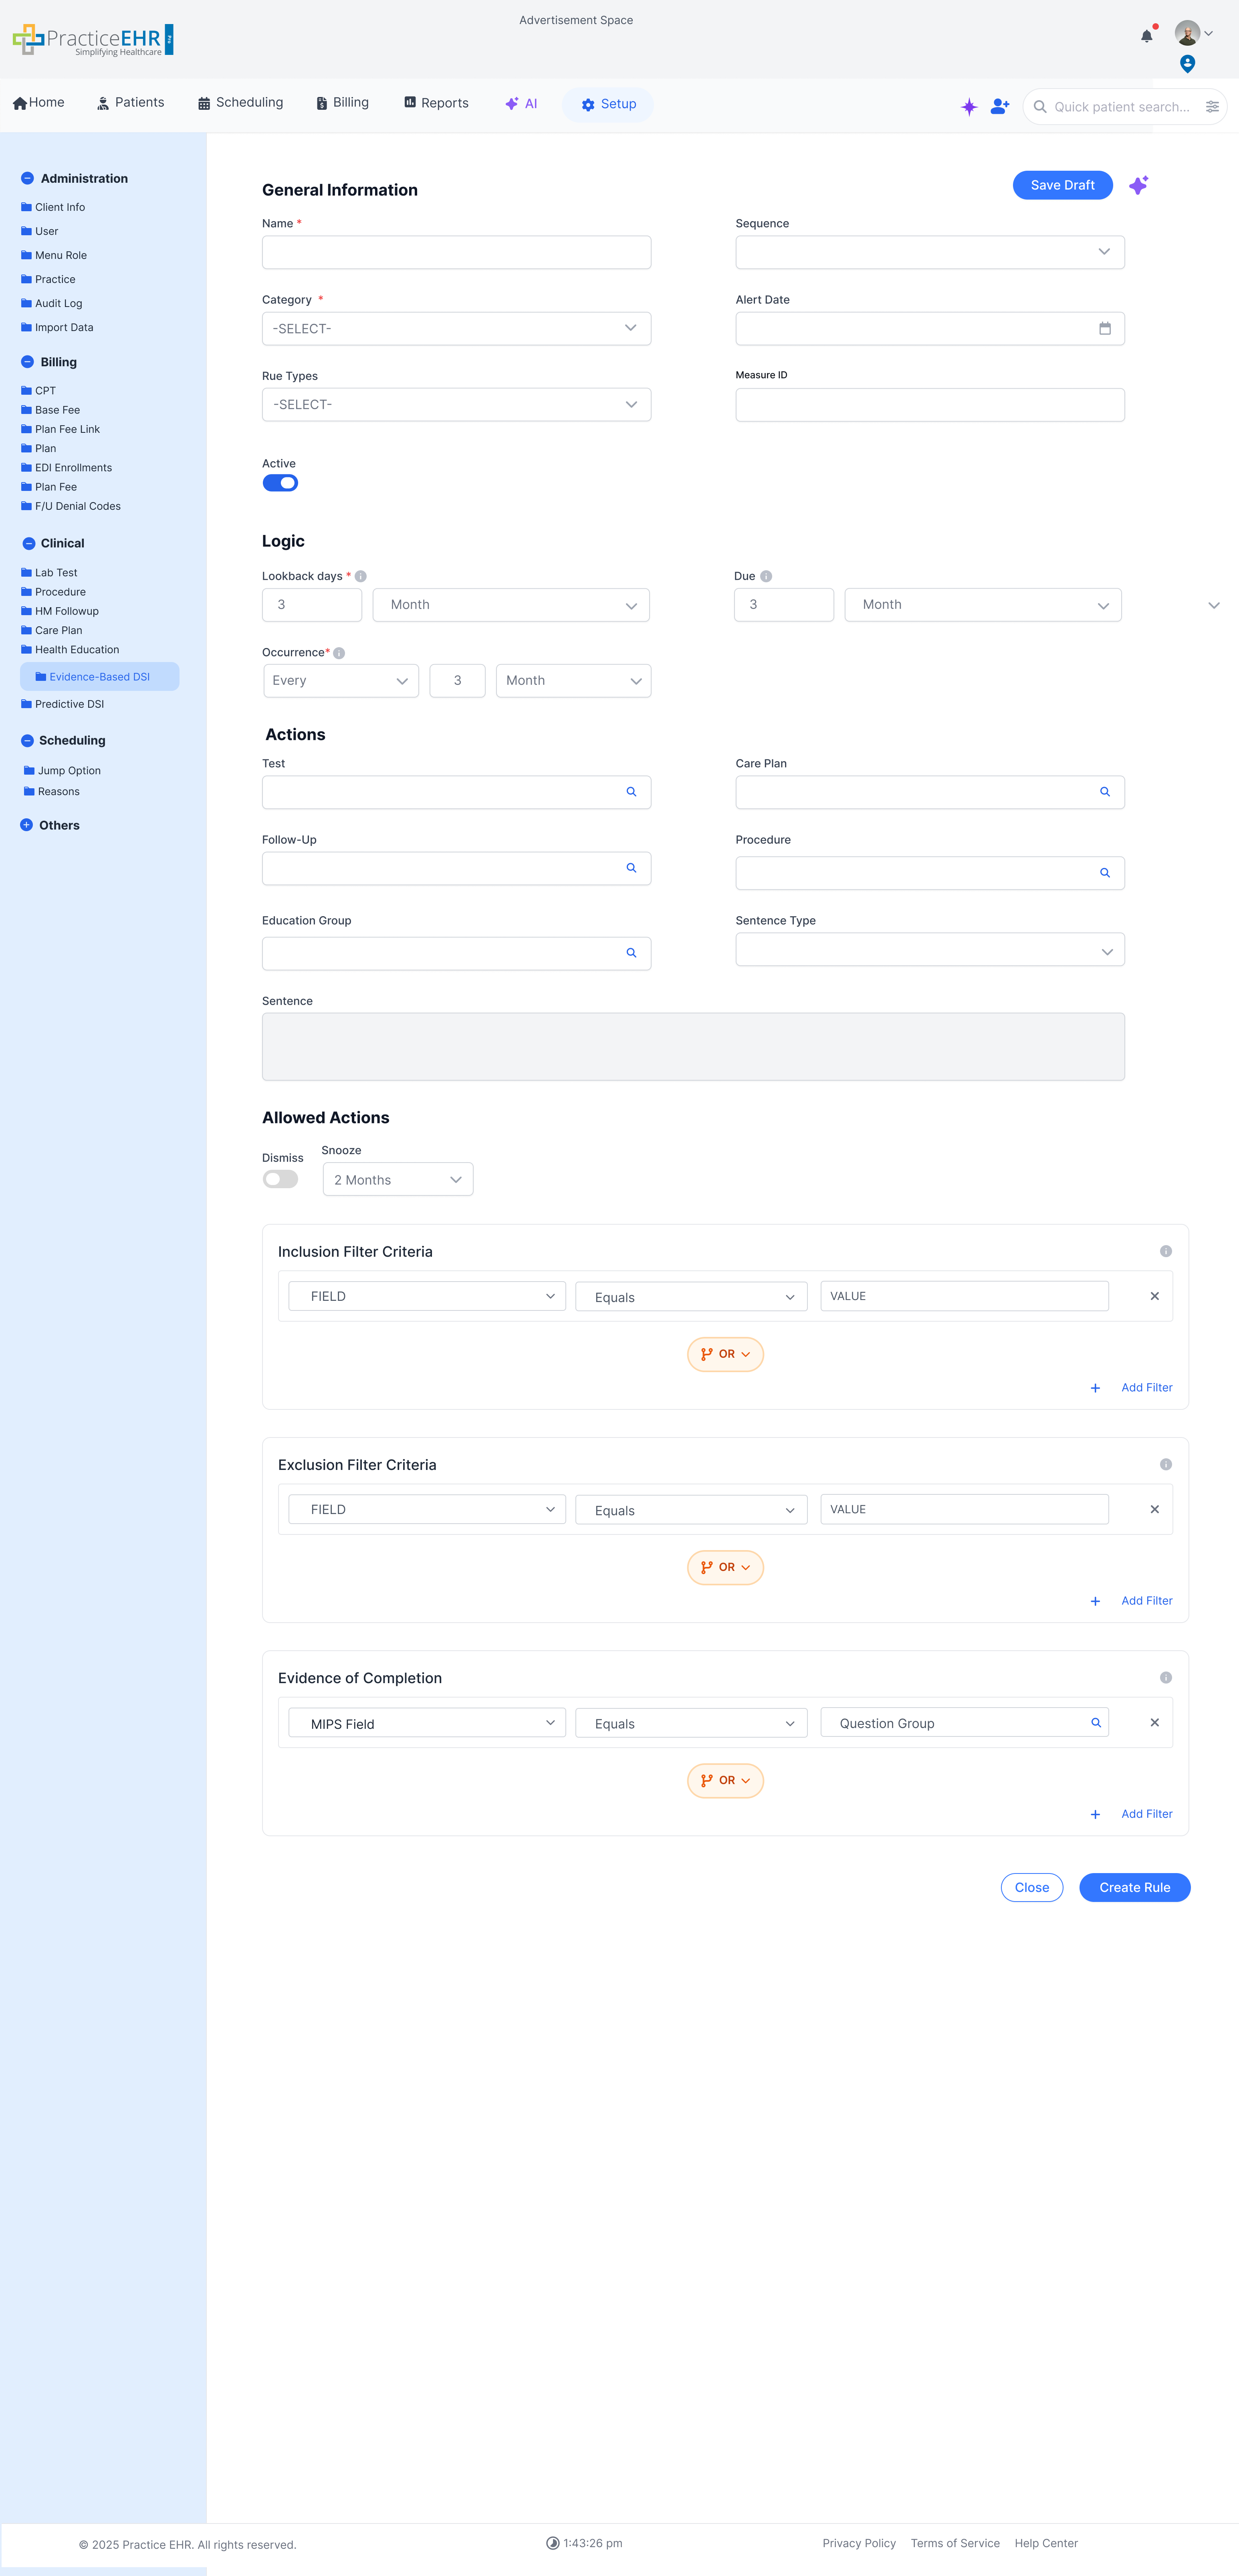
Logic - every field

  • Lookback Days - Uses two fields: one for the number and one for the duration unit (days, weeks, months, or years). A small info icon next to the field explains how Lookback works. This setting tells EBDSI how far back in the chart to search for evidence. Example: 12 + months.
  • Due Months - Also uses a number field and a duration unit. The nearby info icon explains how Due works. This setting tells EBDSI when the item should become due. Due must always be greater than Occurrence. By default, if Occurrence is N, Due is set to N + 1. Users can move it later, but never to the same value or lower.

Logic now groups Lookback, Due, and Occurrence. Each setting uses a numeric value plus a duration unit such as days, weeks, months, or years. The Due rule only applies when Occurrence is set to Every; it does not apply to No-Until.

Example

Rule: "HbA1c check for diabetic patients"

Lookback = 12 + months → "Has this patient had an HbA1c in the last 12 months?"

Due = 3 + months → If the last HbA1c was 9 months ago, the patient is already overdue because the rule expects one every 3 months.

If evidence is found within 12 months and still within the 3-month due window, the alert stays suppressed.

Info Icons In Logic

A small info icon appears next to Lookback Days, Due, and Occurrence in the Rule Builder. Hovering over it opens a tooltip that explains how each field behaves.

Tooltip design: white rounded tooltip card, soft shadow, dark text, and a small bottom pointer, matching the demo tooltip style.

Lookback Days tooltip

Choose how far back EBDSI should look in the patient chart for evidence. Enter a number and select a duration such as days, weeks, months, or years.

Due tooltip

Set when the item becomes due. Enter a number and select a duration such as days, weeks, months, or years. When Occurrence is Every, Due must stay greater than Occurrence.

Occurrence tooltip

Choose how often the alert repeats. Use Every for recurring intervals and No-Until for one-time suppression. When Every is selected, enter a number and duration unit.

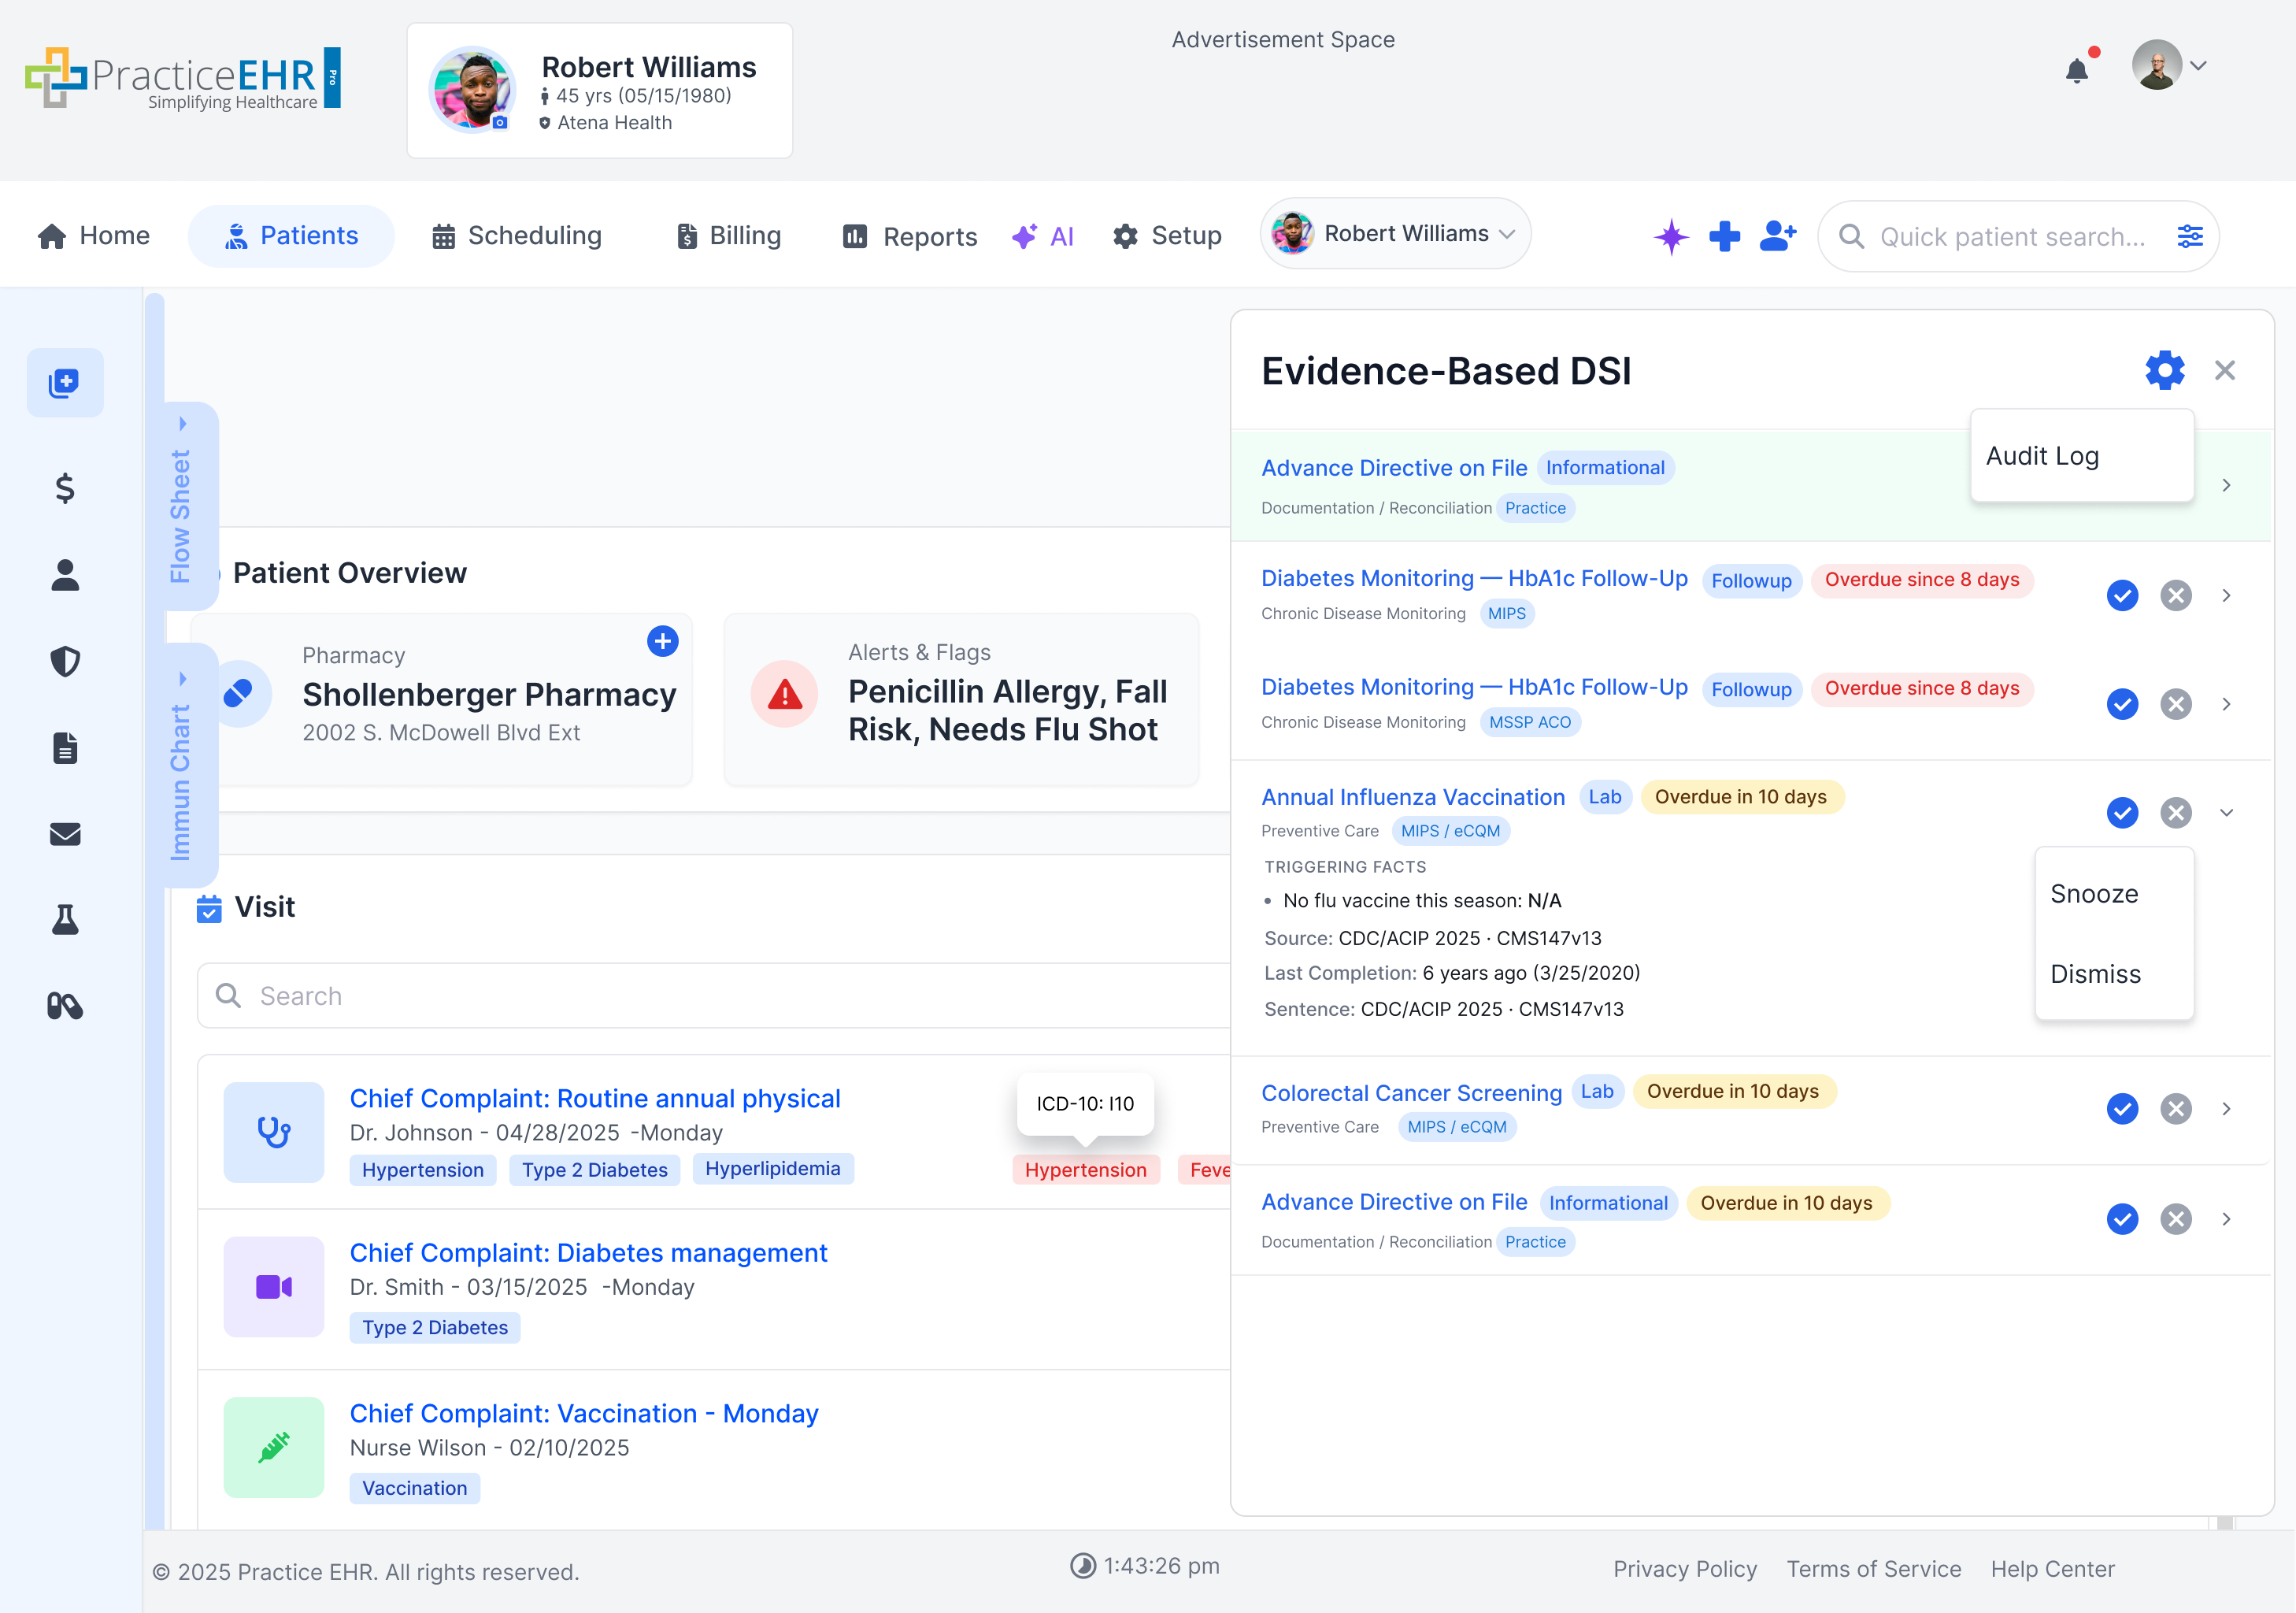
Allowed Actions - every field

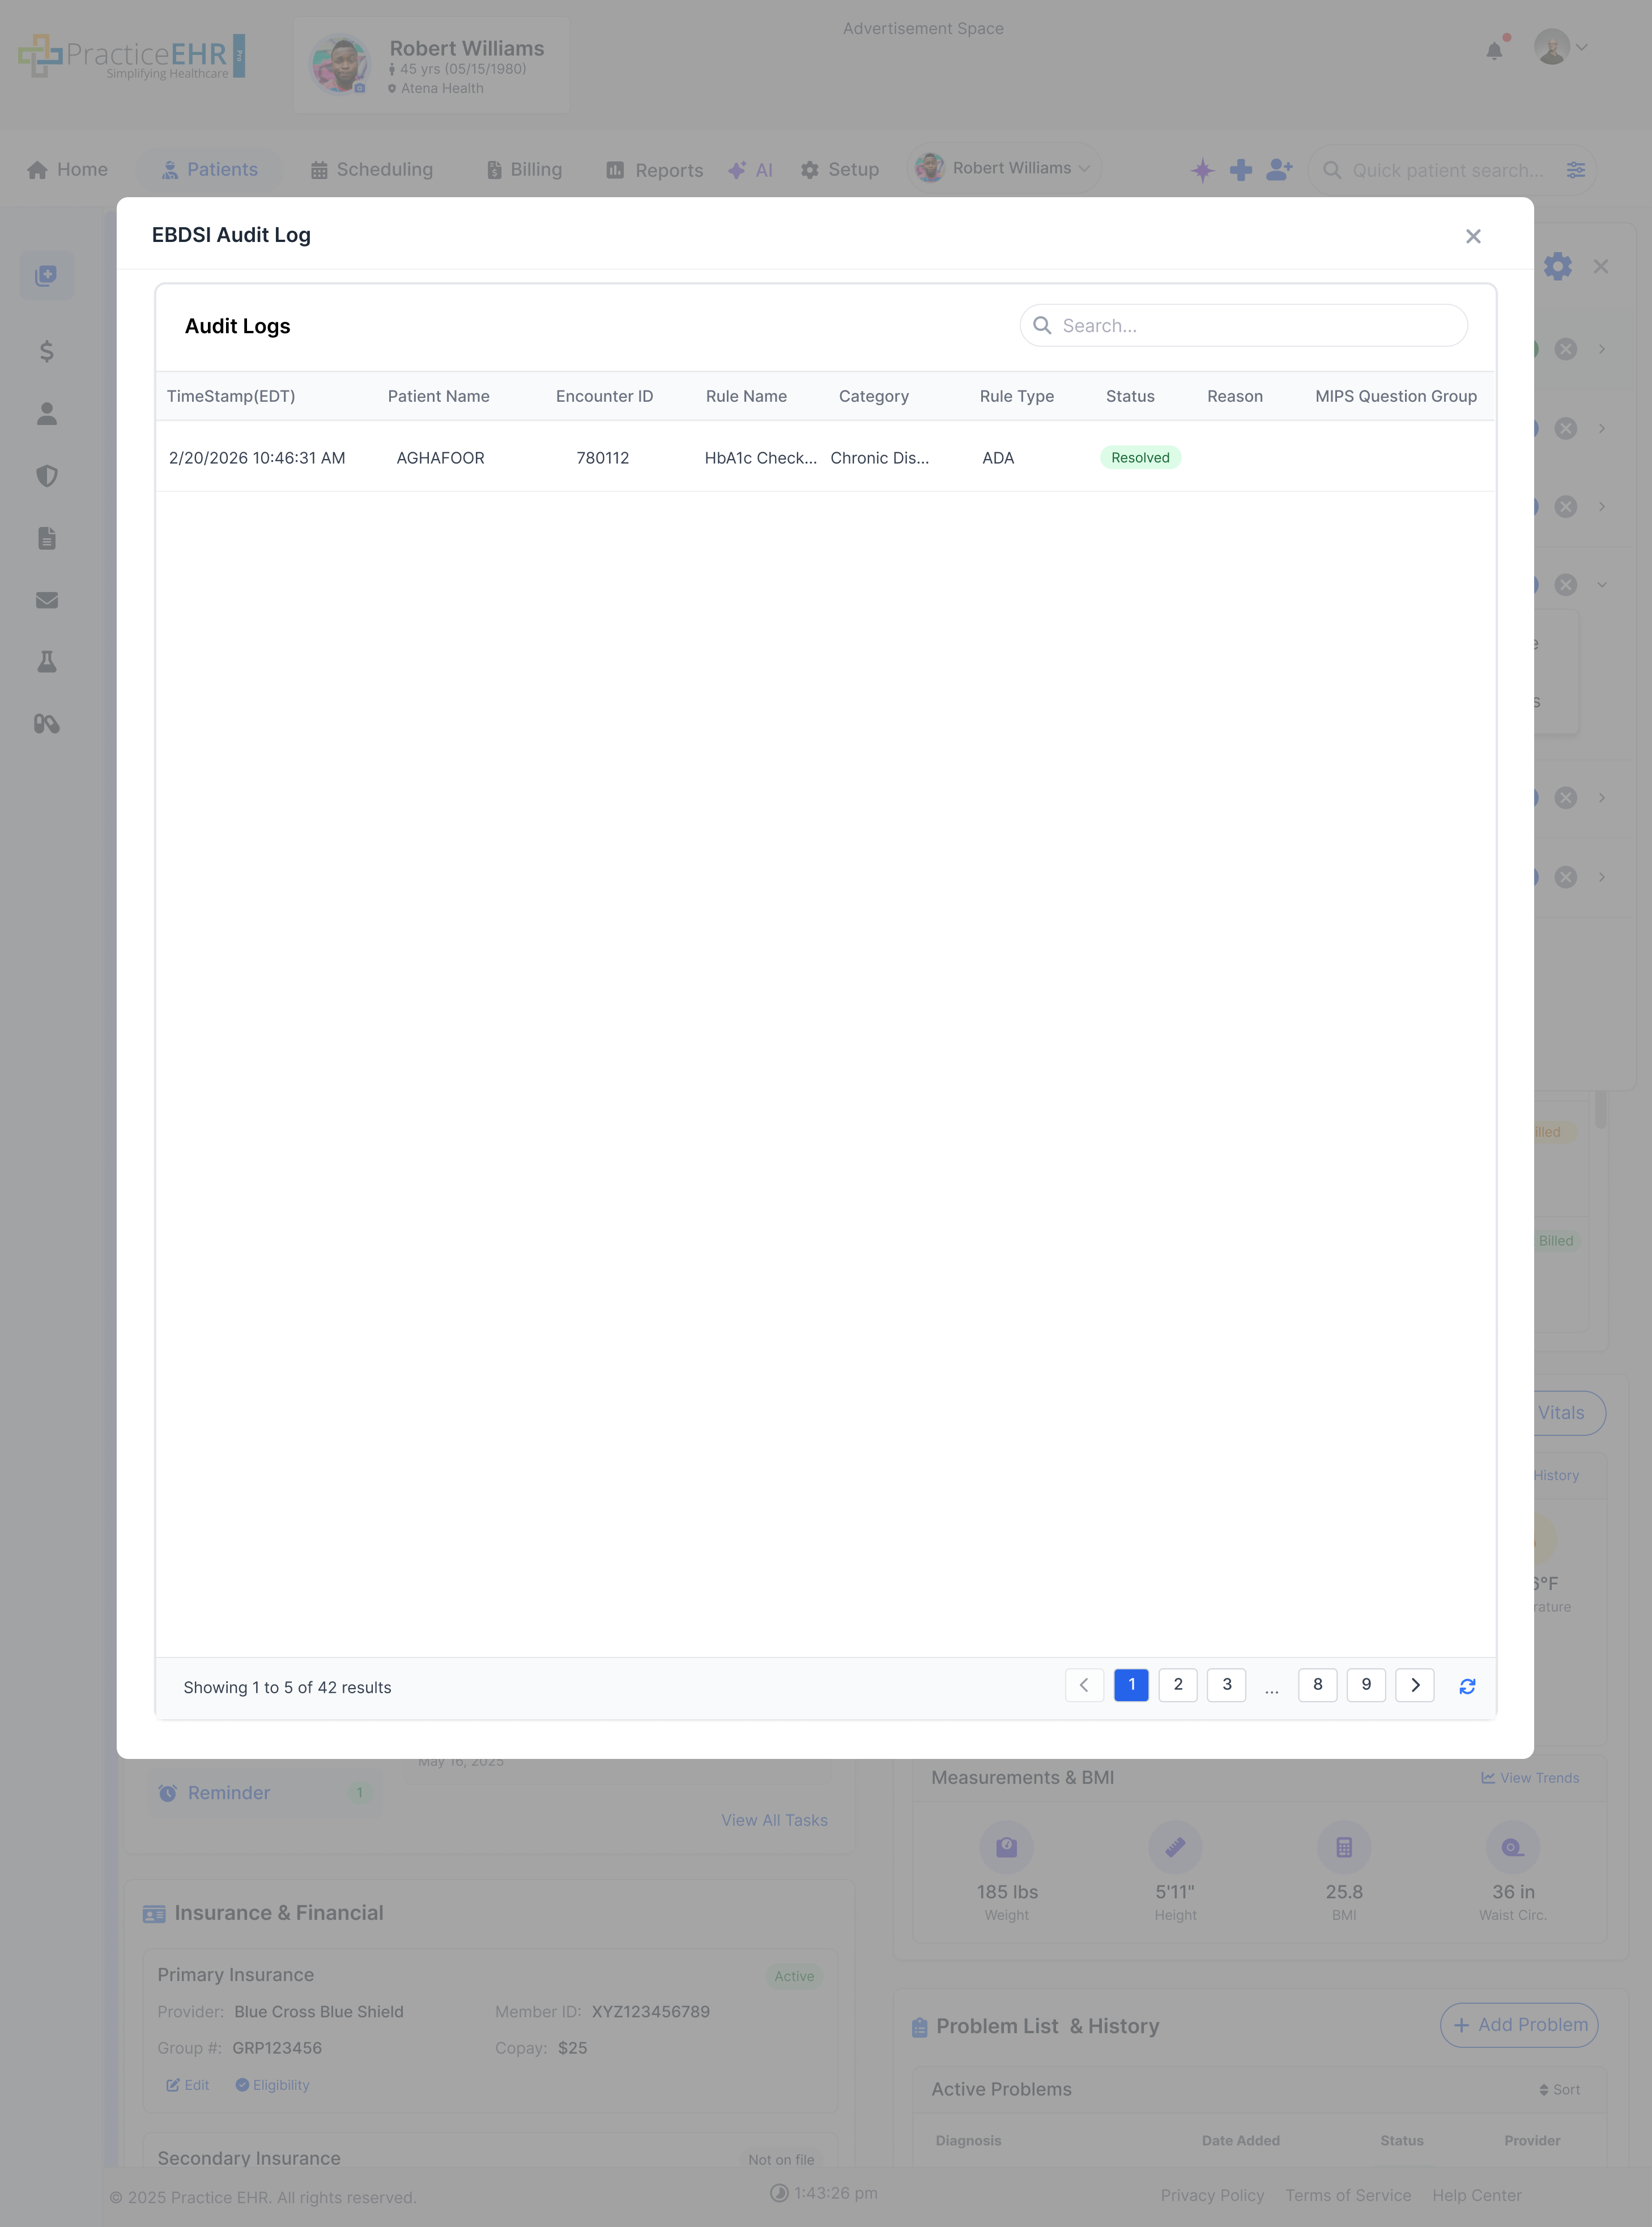
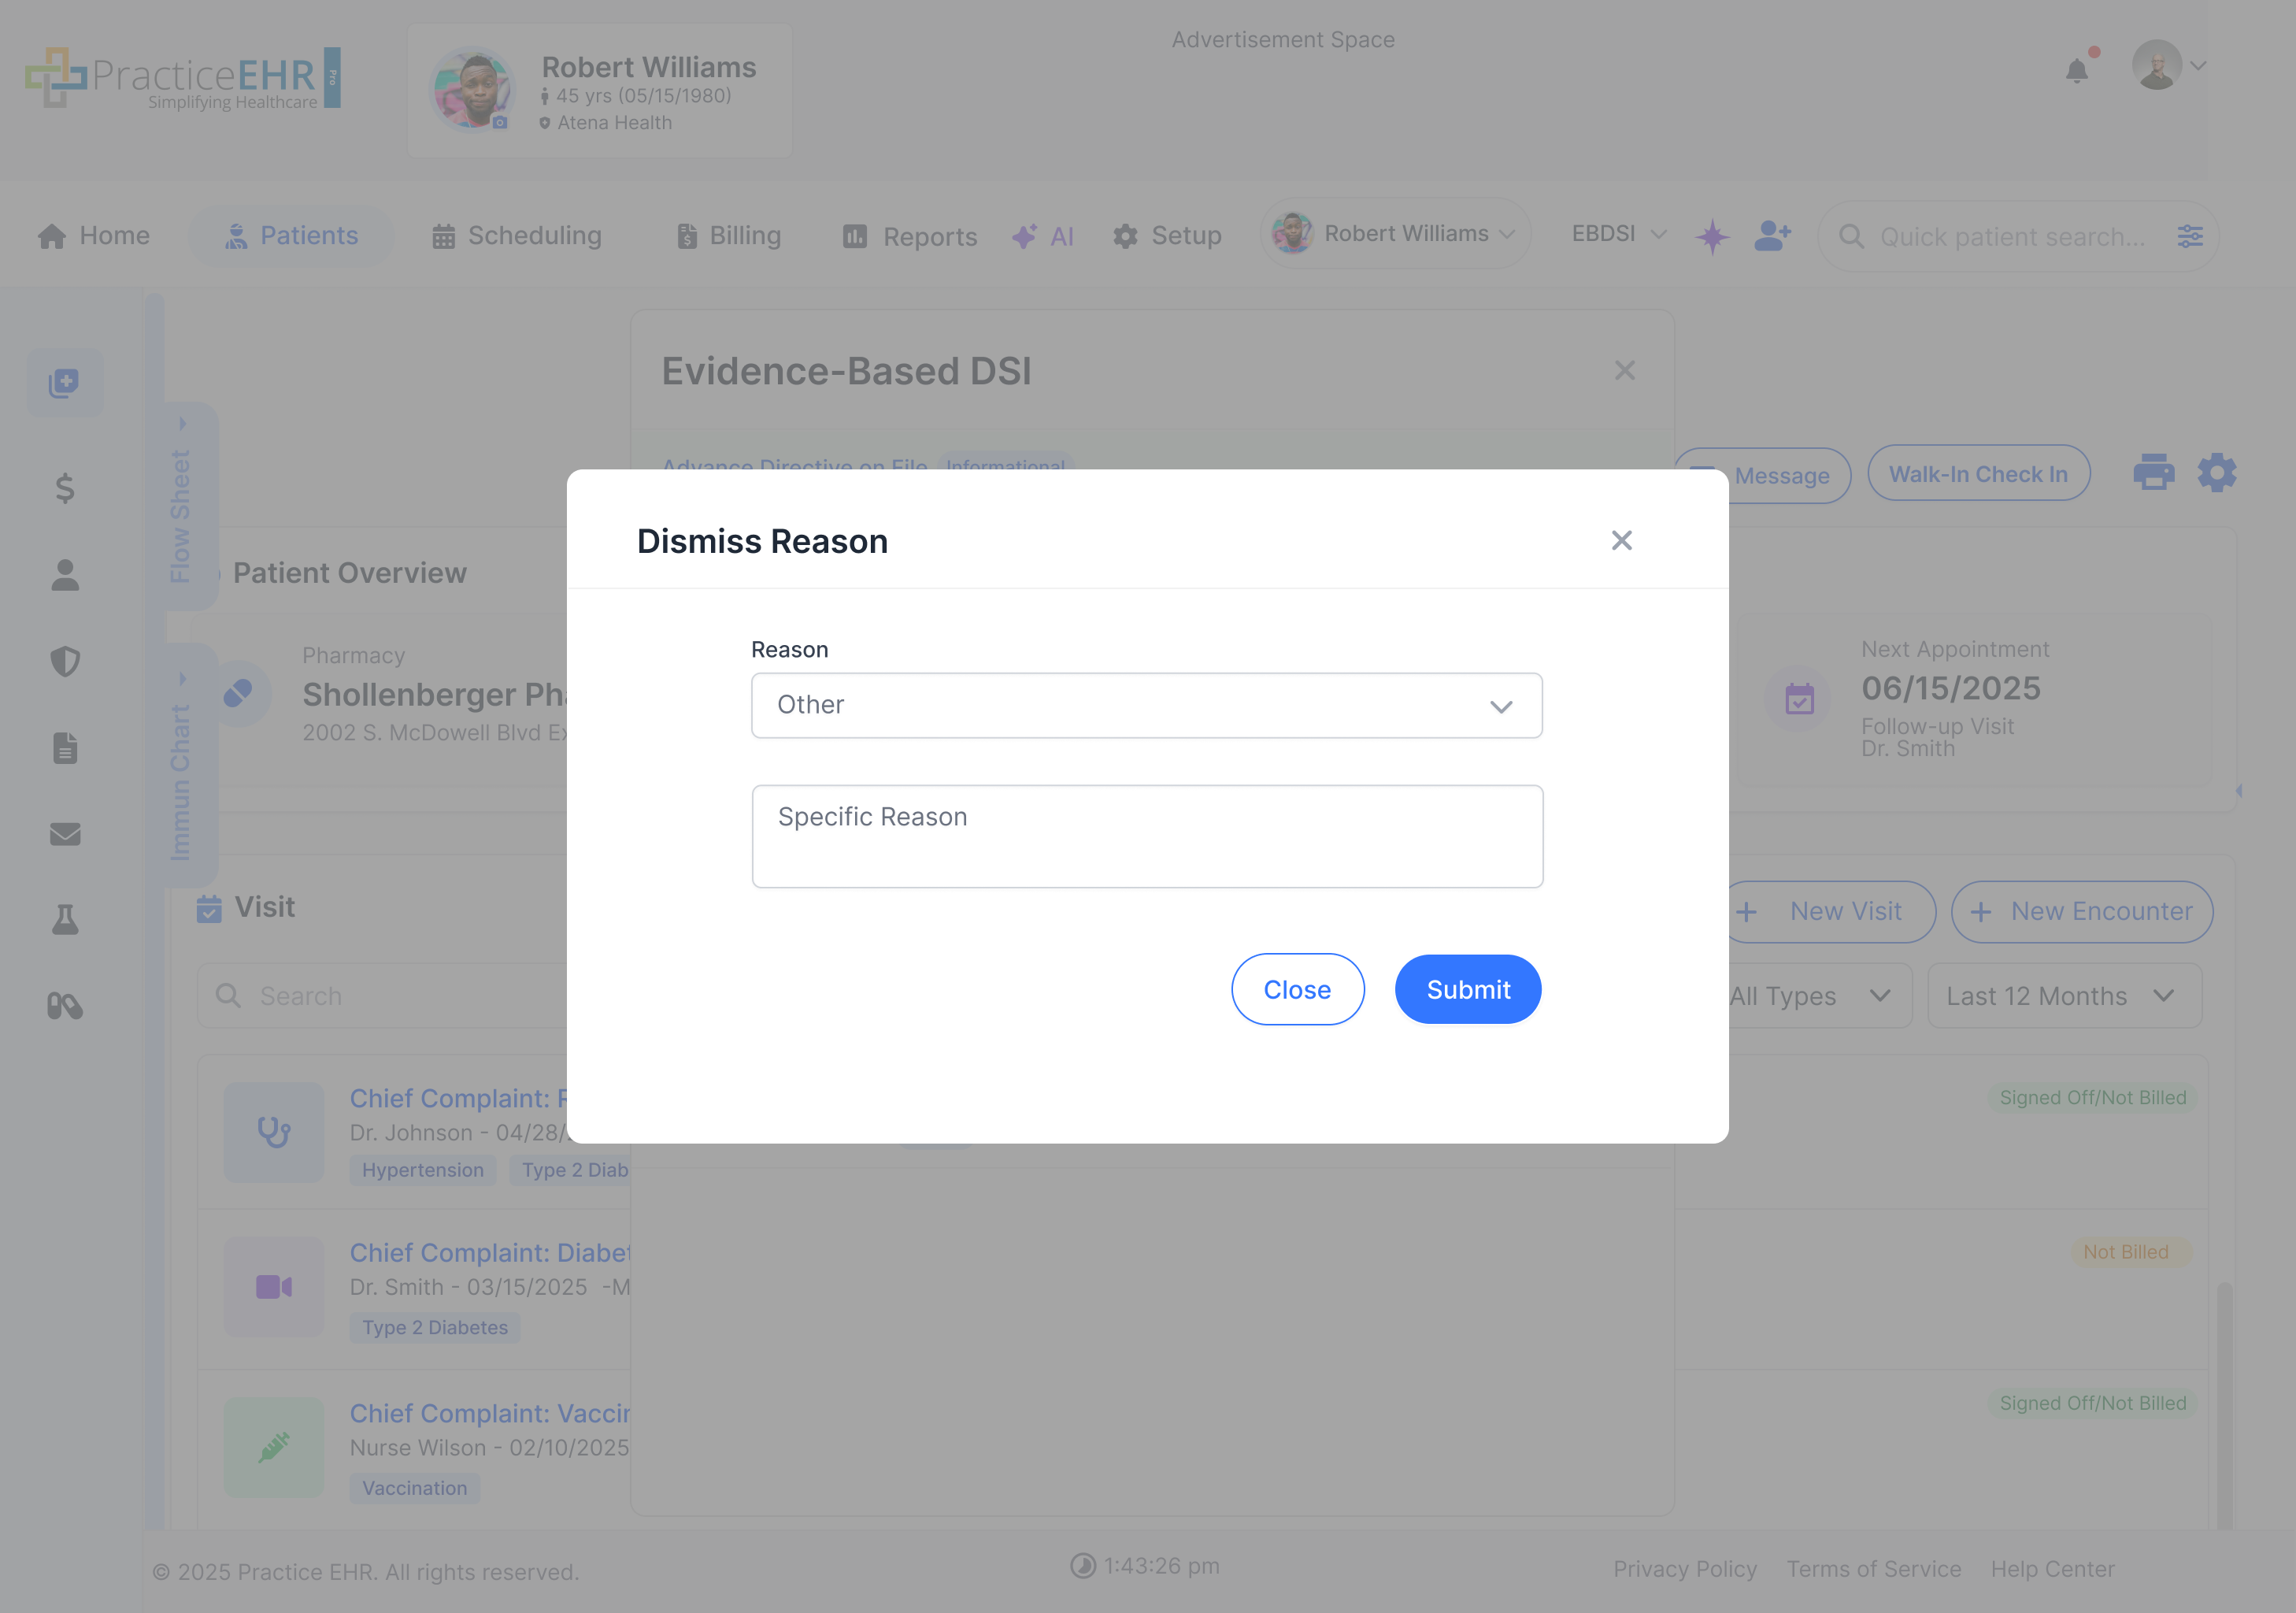
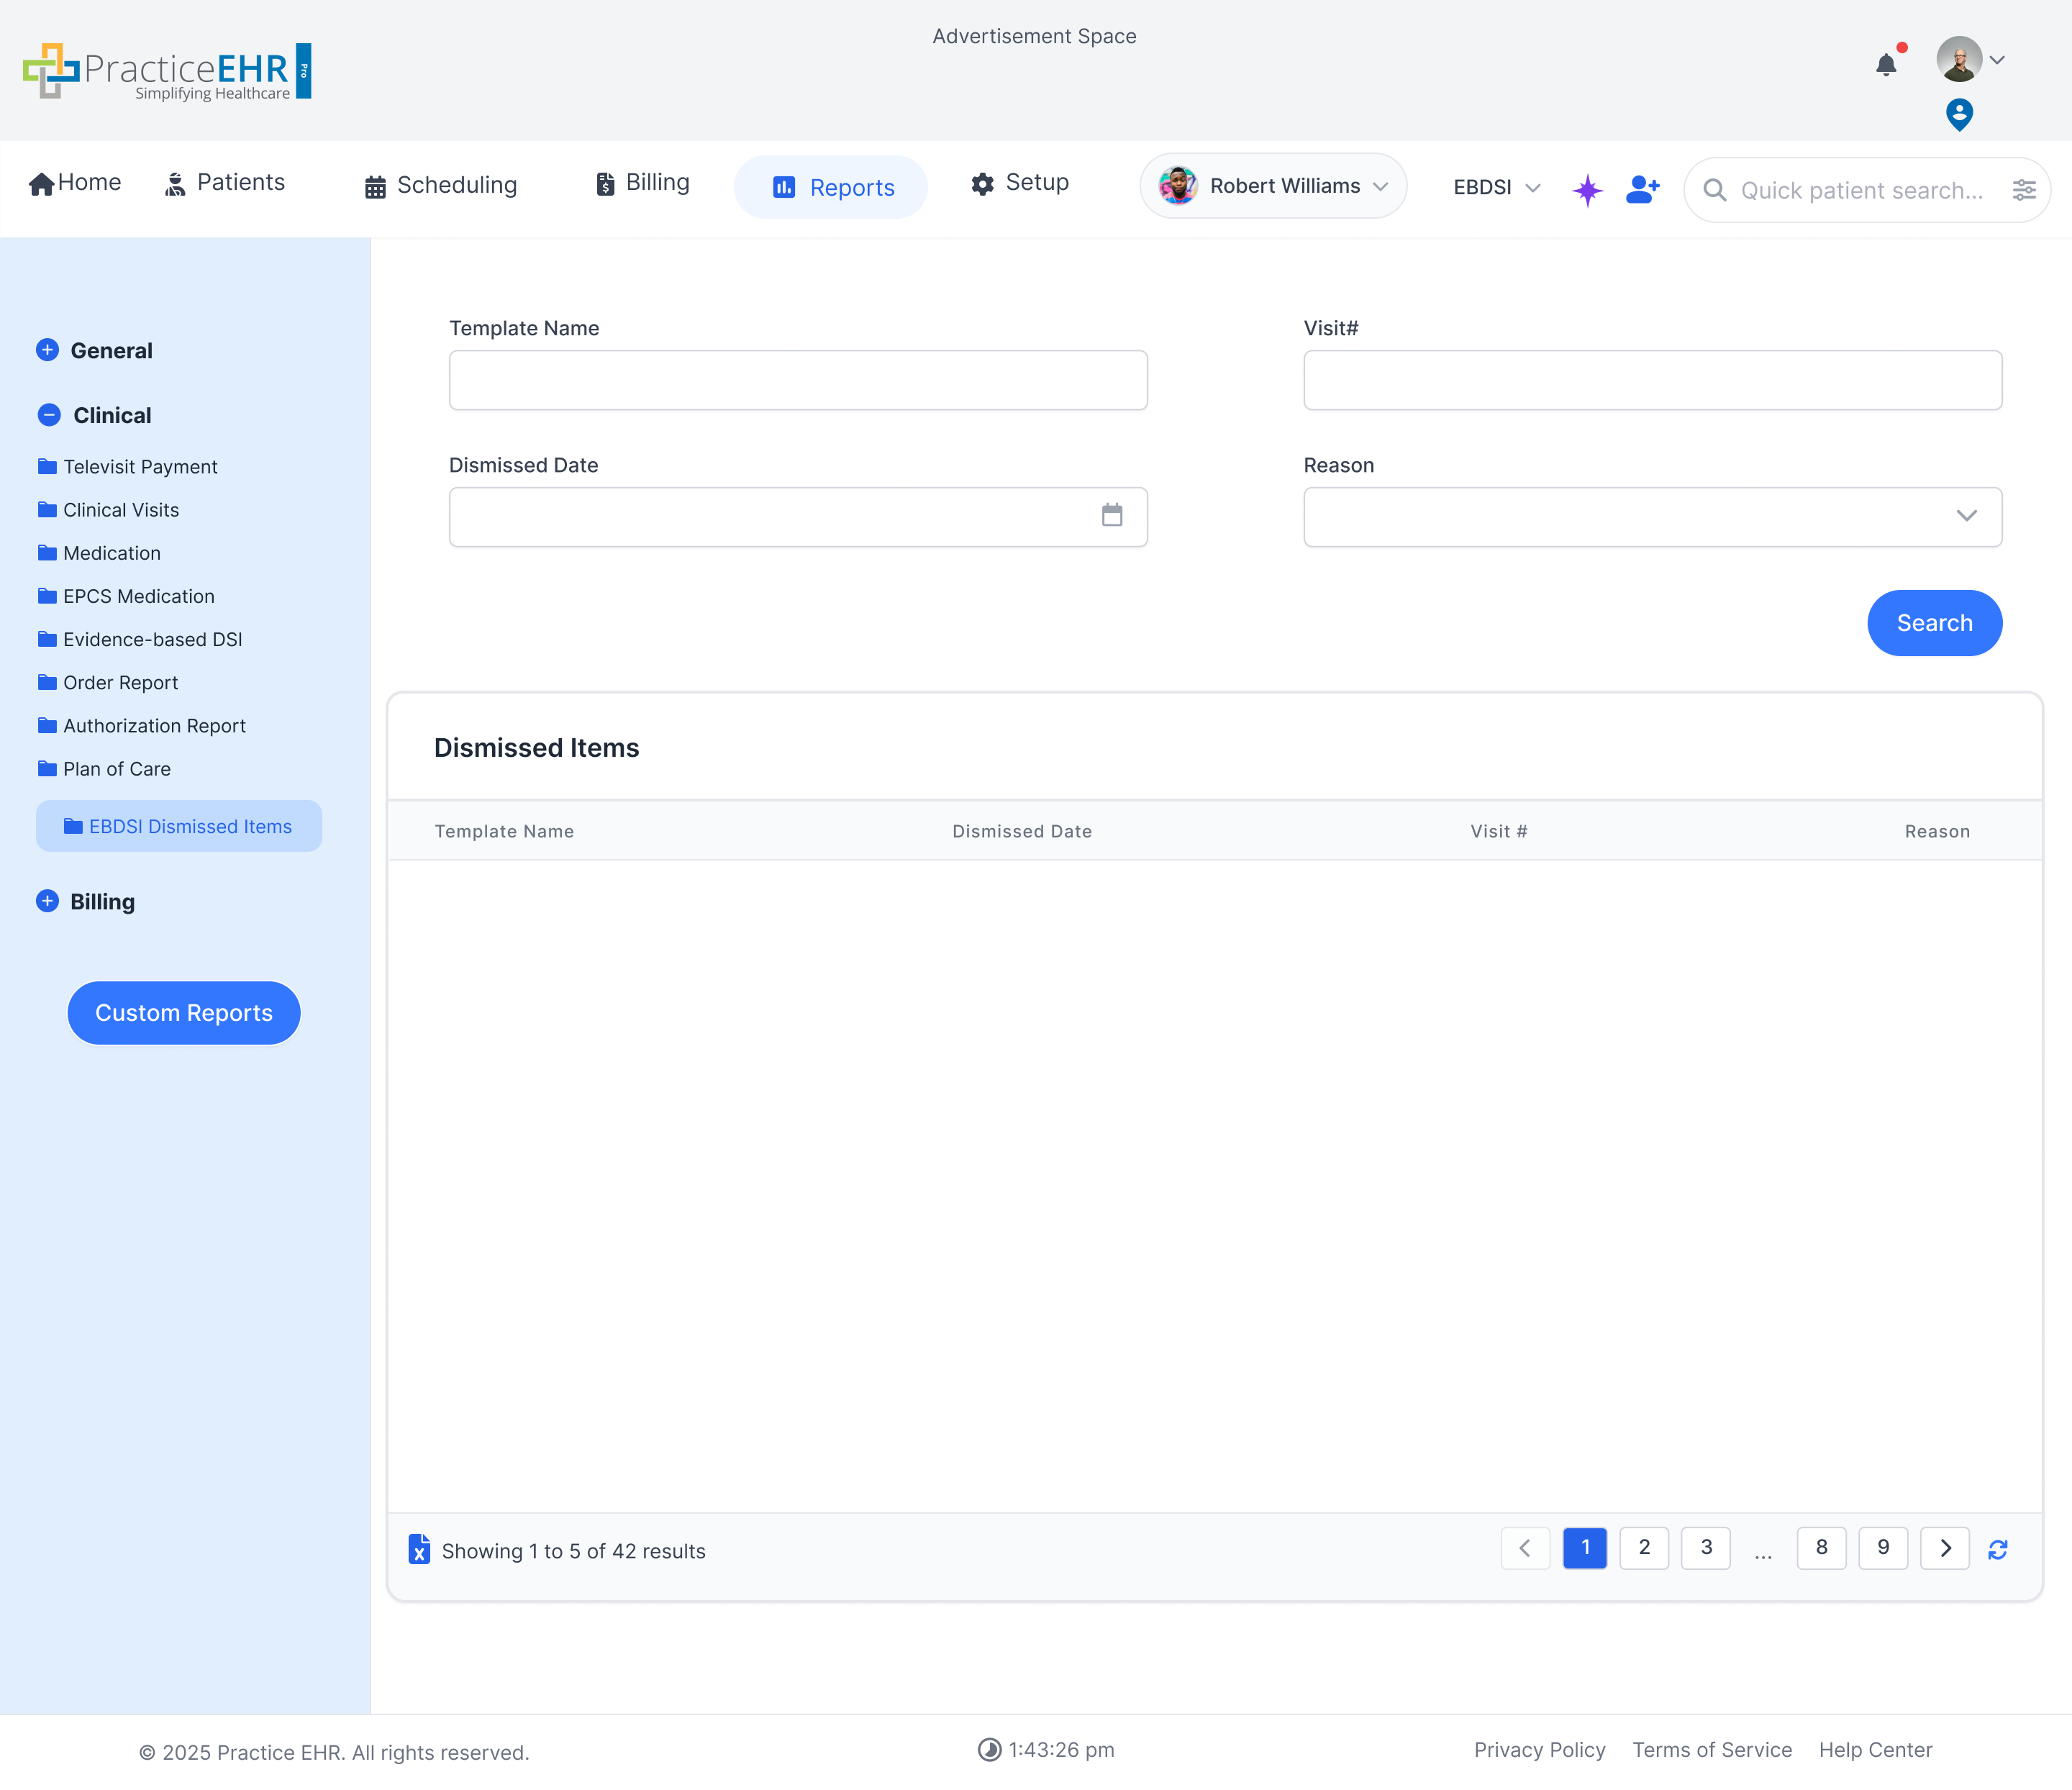
  • Dismiss - Uses the X action flow. Clicking the X icon and choosing Dismiss opens a Dismiss Reason modal. After the user submits a reason, the item leaves the active list and is stored in Reports > EBDSI Dismissed Items. Dismiss does not count as completion evidence, so the item can return later if the criteria match again.
  • Snooze - Snooze is accessed from the same X icon menu. The user can choose 2, 6, or 12 months to hide the item temporarily. When that interval ends, the item can appear again if the criteria still match.
EBDSI Rule Builder main screen
Rule Builder overview - rule details, timing logic, allowed actions, and criteria are all configured from the same screen.
Alert Frequency

Occurrence in Logic

Occurrence is now configured inside Logic. It controls the frequency/repetition of the alert - whether it fires every time the condition is met, or only until a specific action is taken.

Occurrence Options

Option Meaning Use Case
Every Alert fires on every encounter where the condition is true Annual wellness reminders, chronic disease monitoring
No-Until Alert fires once and stays suppressed until a condition is met (or a time passes) One-time screenings, vaccinations
Example - Every

Rule: "Remind to check BP for hypertensive patients"

Occurrence = Every → Uses two fields: one for the number and one for the duration unit (days, weeks, months, or years). Example: Every 2 months means the alert repeats on that interval until BP is documented today.

Example - No-Until

Rule: "Colonoscopy reminder for patients 50+"

Occurrence = No-Until → Fires once. Once colonoscopy CPT code is recorded, suppressed for 10 years.

How Dismiss and Snooze affect Occurrence

  • The next alert won't appear until the current one is resolved. If an alert is showing, you won't see a duplicate for the same issue.
  • Dismiss - Chosen from the X icon menu. It opens the dismiss-reason modal, removes the current alert after submission, and stores that dismissed item in the report. The next occurrence can still appear later if the rule criteria match again.
  • Snooze - Also chosen from the X icon menu. It hides the current alert for the selected 2, 6, or 12 month interval, then allows the alert to return after that interval ends if the rule still matches.
Occurrence field dropdown
Occurrence inside Logic - how often should this alert fire for a patient?
Rule Classification

Category

Every rule belongs to exactly one category. This controls how the item is labeled in the panel, which actions are available, and how it's weighted in prioritization.

The 4 categories

  • Preventive Care - screenings, immunizations, age- or risk-based reminders (e.g., colorectal screening, flu vaccine)
  • Chronic Disease Monitoring - ongoing management gaps for active conditions (e.g., HbA1c for diabetes, BP control for HTN)
  • Documentation / Reconciliation - missing structured data, unaddressed problems, unsigned fields
  • Engagement / Follow-Up - missed visits, referral follow-through, patient outreach
Category is a required field. The wrong category mislabels the item and shifts its priority weight in the panel.
EBDSI category dropdown
Category dropdown - four operational lanes, one per rule.
Source Governance

Rule Type

Each rule is tagged with a rule type so teams can understand whether it comes from a guideline family, a quality program, or an internal practice rule.

Rule type options

  • Evidence-based guidelines - USPSTF, CDC / ACIP, ADA, ACC / AHA, KDIGO
  • Quality programs - CMS eCQMs, MSSP / Commercial ACOs, MIPS, NCQA / HEDIS
  • Internal / practice rules - follow-up cadence, engagement logic, referral prerequisites

Rule type dependency

If Rule Type is set to MIPS or eCQM, the matching type must also be added in Evidence of Completion.

If that matching completion type is missing, the user sees a Rule Type Error telling them that the required type still needs to be added in Evidence of Completion.

EBDSI rule type dropdown
Rule Type dropdown - guideline families, quality program options, and internal rule groupings.
Rule Type Error shown when matching completion type is missing
Rule Type Error - if Rule Type is set to MIPS or eCQM but the matching type is not added in Evidence of Completion, the user sees this validation message.
Who Qualifies

Inclusion & Exclusion Criteria

Two separate sections decide which patients should see an EBDSI item and which ones should not.

Inclusion Filter - Who SHOULD receive this alert?

This defines the target patient population. The alert appears only for patients who match these criteria.

Example

Inclusion: Diagnosis (ICD) = E11 (Type 2 Diabetes)

→ Only patients with diabetes will see this alert

Exclusion Filter - Who should NEVER receive this alert?

This defines patients who should be permanently excluded from the rule, regardless of any other matching conditions.

Example

Exclusion: Allergy = Penicillin

→ Even if a patient matches the inclusion criteria, the allergy keeps the alert from appearing

Info Icons In Criteria Rows

A small info icon appears inside the FIELD selector for both Inclusion Filter Criteria and Exclusion Filter Criteria. Hovering over it explains how that section uses the selected field.

Tooltip design: white rounded tooltip card, soft shadow, dark text, and a small bottom pointer, matching the demo tooltip style.

Inclusion FIELD tooltip

Choose the field EBDSI should check to decide who gets the alert.

Exclusion FIELD tooltip

Choose the field EBDSI should check to decide who should be excluded from the alert.
Inclusion criteria field dropdown
The inclusion and exclusion menus draw from structured clinical facts already available in the chart.
What Closes the Item

Evidence of Completion

This section defines the evidence that closes the rule. Most EBDSI rules look for structured chart data, while MIPS rules use a linked note workflow built around question groups and answer requirements.

Evidence Types

Evidence Type What It Checks
Lab (LOINC) Specific lab ordered or resulted
Medication Medication prescribed or active
Procedure (CPT) Procedure coded and performed
Immunization (CVX) Vaccine administered
Referral Referral placed
MIPS Field Selected MIPS question group answered inside the note workflow
Care Plan Care plan created or updated
Vitals (BP Systolic) Systolic blood pressure value documented
Vitals (BP Diastolic) Diastolic blood pressure value documented
Vitals General vital sign value documented
Social History Structured social history data documented
Encounter Count Encounter volume counted within the selected time window
Example

Rule: "Flu vaccine reminder"

Evidence of Completion: Immunization (CVX) = 141 (Flu vaccine)

→ If that CVX code is already in the chart for this season, the alert never fires

MIPS completion setup

When MIPS Field is selected in Evidence of Completion, the row switches from a generic value picker to a MIPS-specific question-group workflow.

  • Value field - For MIPS, the value side changes to a Question Group field instead of a standard chart-data value picker.
  • Search workflow - Clicking the search icon opens the Add Question Groups modal so the user can choose the group that should be linked to the rule.
  • Sections filter - The modal includes a Sections filter so users can switch between MIPS sections and review only the question groups for the selected section.
  • Question Groups grid - The modal shows a grid of available Question Groups with selection checkboxes and a Number of Questions column.
  • Question details - Question group names are hyperlinked, and clicking a group name opens a details view that shows the questions inside that group.
  • Save flow - After selecting the needed question group, the user clicks Submit to attach it to the MIPS completion setup, or Close to leave without saving.

MIPS-linked completion

MIPS rules rely on a guided note workflow rather than passive chart evidence alone.

  • Question-group based - Each MIPS rule is tied to a structured Question Group, not to a free-form chart value.
  • Accept opens MIPS Questions - When the clinician clicks Accept on a MIPS EBDSI item, EBDSI opens the MIPS Questions modal.
  • Note-only interaction - The provider can only complete a MIPS item from an open, unsigned clinical note tied to the current encounter.
  • Closure rule - Until at least one question from the selected Question Group is answered, or the alert is dismissed, neither the EBDSI item nor the note can be signed or closed.

VS Exclusion Filter

Exclusion Filter = "This type of patient should never see this alert" (permanent category exclusion)

Evidence of Completion = "This patient already completed the required action" (time-sensitive resolution)

If Evidence of Completion closes the task automatically, the item is no longer due and drops off the active list.

Note signing gate

The clinical note cannot be signed or closed while any MIPS-linked EBDSI item is still unresolved. If no question from the selected Question Group is answered in the MIPS Questions modal and the alert is not dismissed, the system blocks sign-off and keeps those questions tied to the open visit workflow.

Resolution paths

Accept and answer MIPS questions - Clicking Accept opens the MIPS Questions modal, and answering at least one question from the selected group updates the MIPS section in the open visit.

Dismiss with a reason - The item moves to Dismissed status, the signing gate clears, and the dismissal stays visible in the Reports section.

Important - If the open visit does not already contain a MIPS section, EBDSI adds it automatically when the alert is configured through EBDSI. If no question from the selected group is answered, the note cannot be signed or closed.

Evidence of completion field dropdown
Standard evidence of completion - structured chart data that closes an EBDSI item once the expected evidence is present.
MIPS field selected in EBDSI evidence of completion
MIPS-linked evidence of completion - selecting MIPS Field switches the value side to a Question Group workflow.
MIPS question group search modal
Add Question Groups modal - users can filter by MIPS section, review available question groups, click a hyperlinked group name to inspect its questions, and then save the MIPS mapping.
Question group details modal showing questions inside a MIPS question group
Question Group Details - clicking a hyperlinked Question Group name opens the full list of questions inside that group so admins can verify the correct mapping before selecting it.
Criteria Logic

Logic Operators

Each criteria row uses an operator to define the condition. Multiple rows combine with AND or OR.

Operators and what they mean

  • Equals / Not Equals - exact match or mismatch against a value
  • Has / Does Not Have - presence or absence of a diagnosis, medication, immunization, etc.
  • Greater Than - numeric value is above a threshold (e.g., age > 65, BMI > 30)
  • Less Than - numeric value is below a threshold (e.g., eGFR < 60)
  • Greater Than or Equal To - numeric value meets or exceeds a threshold (e.g., HbA1c ≥ 7)
  • Less Than or Equal To - numeric value is at or below a threshold (e.g., BP systolic ≤ 130)
  • In Range / Not In Range - numeric value falls within or outside a defined range (e.g., BP between 120–139)
  • Exists Within [N days] - evidence found inside the lookback window
  • Does Not Exist Within [N days] - no evidence in the window → this is what triggers the item
  • Count Within Time - requires ≥ N results or events in a defined window

Combining rows

  • Link rows with AND (all must match) or OR (any must match)
Logic operator dropdown for criteria
Operators covering absence logic, range checks, and count-within-time.
Assisted Drafting

AI Rule Builder

Authorized users can describe a rule in plain language. AI generates a structured draft that populates the Rule Builder fields.

Who can use this

EBDSI administrators, clinical informatics staff, quality and compliance leads, and designated clinical owners.

How it works

  • Click AI Builder inside the Rule Builder
  • Type a plain-language request - e.g., "Diabetes rule for patients missing A1C in the last 6 months"
  • AI generates: category, inclusion / exclusion criteria, time logic, due / overdue thresholds, allowed actions
  • Click Apply - fields populate in the Rule Builder form
  • Review and edit manually, then save
AI Rule Builder prompt dialog
Natural-language input generates a structured draft - always requires human review before activation.
Clinician Workspace

EBDSI Panel

This is the clinician-facing view during a visit. When the chart opens, EBDSI reviews the patient data and surfaces the items that matter right away.

How to get here

Open a patient chart and the EBDSI panel appears automatically on the right side of the screen.

Panel layout

  • Status pills - Items can show two pills. The first shows the item context, such as Lab, Followup, or Informational. The second shows timing, such as Overdue in 10 days for due items or Overdue since 8 days for overdue items.
  • Program badges - ACO, MIPS / eCQM, and Practice context appears inline on each item instead of in separate pop-ups.
  • Triggering facts - Expand any item to see the specific data that caused it to appear.

Status outputs

  • Due - Due items show the second timing pill as Overdue in X days, for example Overdue in 10 days.
  • Overdue - Overdue items show the second timing pill as Overdue since X days, for example Overdue since 8 days.
  • Context pill - The first pill can still show labels such as Informational, Followup, or Lab.

Sorting

  • Items already showing Overdue since X days surface ahead of items still showing Overdue in X days.

Auto-Resolution Logic

Resolved status depends on the evidence already present in the chart.

  • If evidence already exists in the patient chart - the alert never appears.
  • If evidence is added during the current visit - the alert may appear at first, then disappear automatically once the result or action is documented.
  • If no evidence is found - the alert stays visible so the provider can act on it.

This helps reduce alert fatigue because EBDSI does not keep surfacing work that is already complete.

EBDSI Today's Focus panel
EBDSI panel overview - the right rail shows active items, status pills, inline program badges, and row-level actions.
EBDSI panel Reminders and Others
Expanded row actions - the item keeps its actions on the row, with the menu exposing Snooze and Dismiss when needed.
Clinician Interactions

Actions

These are the actions clinicians can take on EBDSI items directly from the panel.

Default Actions

All actions are enabled by default, so clinicians can choose the response that best fits the item in front of them.

Available Actions

  • Accept (checkmark) - The main action for resolving the item. Standard items can move forward immediately, while MIPS items open the MIPS Questions modal.
  • X icon menu - The X icon opens the row-level action menu for Snooze and Dismiss.
  • Snooze - From the X icon menu, the user can hide the item for 2, 6, or 12 months.
  • Dismiss - From the X icon menu, choosing Dismiss opens the dismiss-reason modal. After submission, the item is stored in Reports > EBDSI Dismissed Items.

Accept modal for MIPS items

When a clinician clicks Accept on a MIPS-linked EBDSI item, the system opens a MIPS Questions modal instead of finishing the action immediately.

  • User must answer them - The clinician must answer at least one question from the selected question group directly in the modal.
  • Updates open visit - The submitted answers update the MIPS section in the open visit.
  • Auto-adds MIPS section - If the open visit does not already contain a MIPS section, EBDSI adds it automatically when the alert is configured in EBDSI.
  • Close gate - If no question from the selected question group is answered, neither the EBDSI item nor the note can be signed or closed.

Dismiss modal

When a clinician clicks Dismiss, the system opens a Dismiss Reason modal instead of dismissing the item immediately.

  • Structured dropdown - The provider must select one reason from Patient Refused, Medical Contraindication, Not Applicable (already met outside system), or Other.
  • Other requires detail - If Other is selected, a free-text box appears and the provider must enter the specific dismissal reason before submitting.
  • Submission behavior - The item moves to dismissed status only after the provider submits the modal with a valid reason, and dismissed items remain available in the Reports section.
EBDSI item actions
Item actions in the panel - Accept stays on the row, while the action menu reveals Snooze and Dismiss.
MIPS Questions modal for MIPS acceptance
MIPS accept workflow - clicking Accept opens MIPS Questions so the clinician can answer at least one question from the selected group before closing the note.
Dismiss reason modal for actions workflow
Dismiss reason modal in the Actions workflow - MIPS-linked dismissals require a structured reason, and choosing Other reveals the required free-text field.
Reporting

Dismissed Items Report

Dismissed EBDSI items do not disappear from reporting. Once a provider dismisses an item with a valid reason, it remains available in the Reports section for review and audit tracking.

Where dismissed items appear

  • Reports navigation - Dismissed EBDSI items appear under Reports > EBDSI Dismissed Items.
  • Audit visibility - The report keeps a record of items dismissed from the active EBDSI list so teams can review what was dismissed and why it was dismissed.
  • Reason retained - The dismissal reason selected in the modal carries forward into the report view.
EBDSI Dismissed Items report in Reports section
Dismissed Items report - dismissed EBDSI alerts remain available in Reports, where users can filter by template, visit, date, and reason.
Audit Trail

Audit Log In Patient Chart

EBDSI activity is also recorded in the patient chart, giving teams a quick way to see when an alert was added without opening the rule builder or reports.

What gets recorded

  • Template name - The patient chart history records the EBDSI template name for the item that was added.
  • Date added - The history entry also records the date the EBDSI item was added to the patient workflow.
  • Chart-level traceability - This creates a simple audit trail directly inside the patient chart for clinical, quality, and compliance review.
Patient chart showing EBDSI history entry
Patient chart audit trail - EBDSI items are recorded in chart history with the template name and the date they were added.
Why Am I Seeing This

Attribute Info

Every EBDSI item can explain why it appeared. Clinicians and auditors can trace the item back to its source, data, and rule logic.

Attribute Info modal

Opens when the clinician clicks the hyperlinked item title in the EBDSI panel. It captures the metadata that makes the rule auditable and defensible:

De-duplication

If multiple guidelines point to the same care gap, EBDSI surfaces one item instead of several. All source citations appear together in the evidence panel.

When duplication happens: The original item is still taken into account so overdue timing can be calculated correctly. This preserves the first due date and keeps the item's priority status accurate throughout its lifecycle.

Attribute Info modal
Attribute Info modal - opens from the hyperlinked item title in the EBDSI panel and shows citation, ownership, and population context for the rule.